Alerts & Notifications
Cloud Exclusive
Alerts and notification channels are exclusively available on Swetrix Cloud. They are not currently available for self-hosted instances.
Alerts let you monitor your website in real-time and get notified the moment a metric crosses a threshold you care about — traffic spikes, drops in active users, JavaScript errors after a deployment, or important custom events like signups and purchases. You stay on top of what matters without keeping a tab open on the dashboard all day.
Each alert is wired to one or more notification channels that decide where the message is sent (email, Telegram, Discord, Slack, browser push, or your own webhook).
Notification channels
Before you can create an alert, you need at least one notification channel. Channels are managed independently of alerts so you can re-use the same destination across many alerts (or send a single alert to several places at once).
Supported channel types
| Channel | What it does | Verification |
|---|---|---|
| Delivers a rich HTML email with a one-click unsubscribe link. | Confirmation email | |
| Telegram | Sends messages via the @swetrixbot bot to your private chat. | Linked through the bot |
| Discord | Posts to a Discord channel via an incoming webhook URL. | Validated on save |
| Slack | Posts to a Slack channel via an incoming webhook URL. | Validated on save |
| Webhook | Sends a JSON POST to a URL of your choice with an optional HMAC-SHA256 signature. | Webhook ping |
| Web push | Native browser push notifications for the device you subscribe from (desktop or mobile). | Verified on subscribe |
Channel scopes
Channels live at one of three scopes, which controls who can use them and where they appear:
- User — Personal channels you own. Available across all of your projects (and any project you have admin rights on). Manage them in Account Settings → Communications → Notification channels.
- Organisation — Shared with everyone in an organisation. Useful for a team-wide #alerts Slack channel or an on-call email distribution list. Managed in Organisation Settings → Notification channels by organisation owners and admins.
- Project — Specific to a single project. Handy when one site needs to notify a different audience than the rest. Managed in Project Settings → Notification channels.
When you build an alert, you can pick from any channel that is in scope for that project — your personal channels, the project's organisation channels, and the project's own channels are all available in the picker.
Connecting a channel
Open the right Notification channels page
Decide which scope you want the channel to live at (User / Organisation / Project — see above) and open that scope's Notification channels section.
Click "Add channel" and pick a type
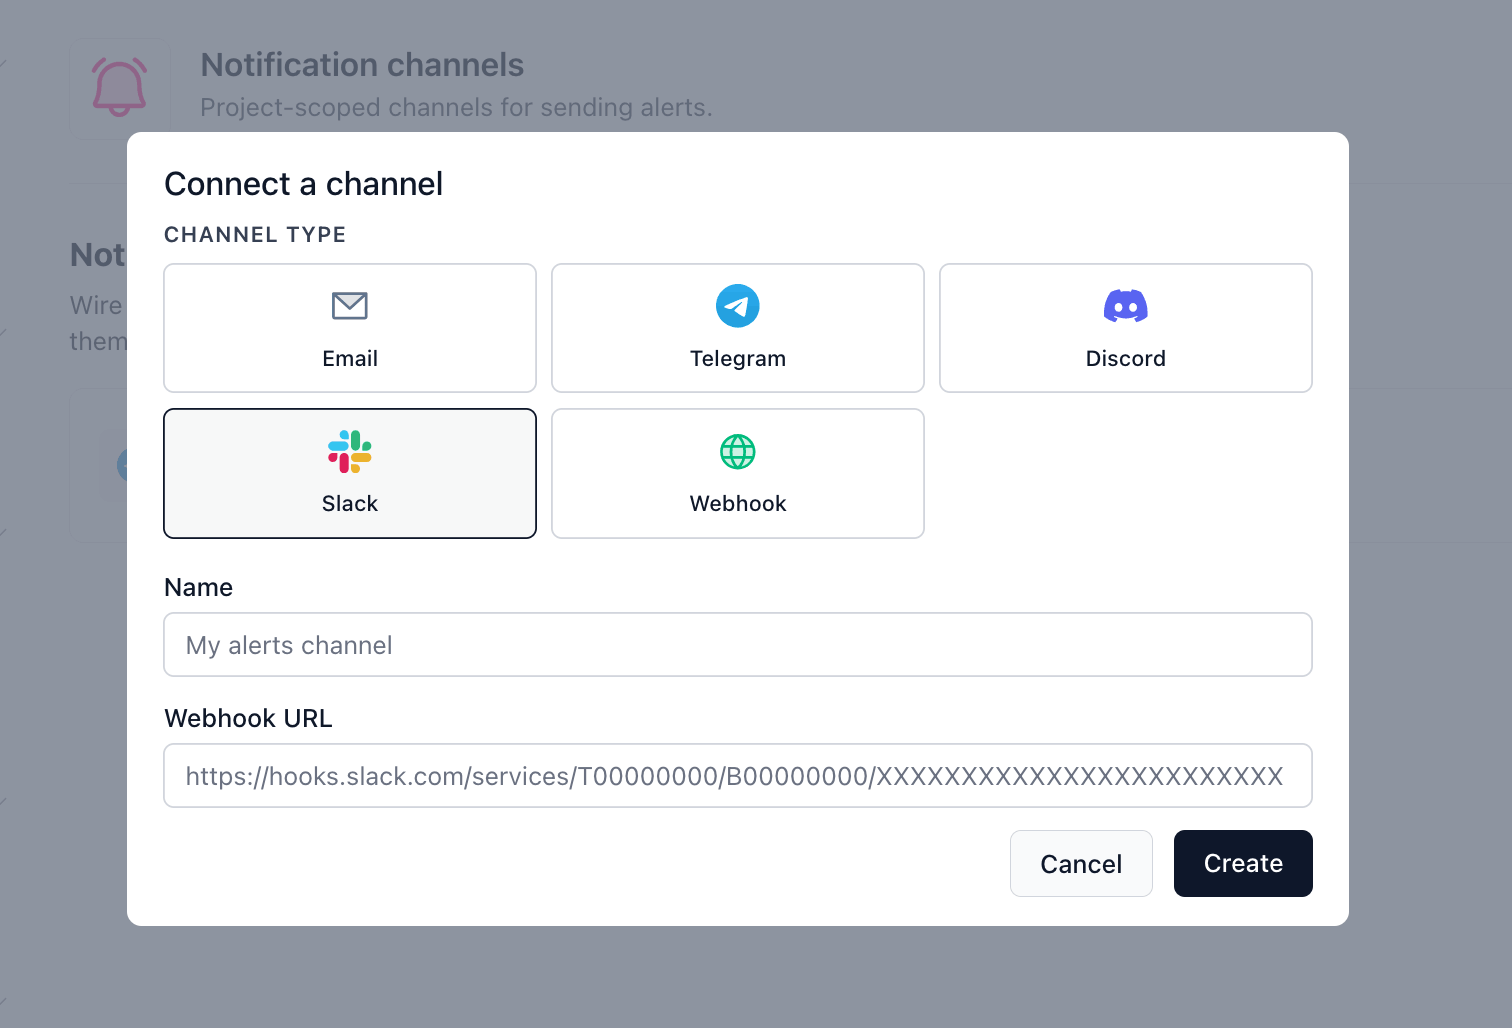
Each type has slightly different details. Pick the tab below that matches the destination you want to wire up.
Enter the destination address. Swetrix sends a confirmation email with a one-click verification link — the channel stays in the Pending verification state until that link is clicked.
Every alert email includes a one-click Unsubscribe link in the footer. If a recipient clicks it, the channel is marked Unsubscribed and Swetrix stops sending alerts to that address until you re-verify it.
- Open @swetrixbot on Telegram.
- Send
/start. The bot replies with your numeric chat ID. - Paste that chat ID into the Telegram chat ID field.
The channel is verified automatically once linked through the bot.
Paste the incoming webhook URL from your Discord server's channel settings (Server Settings → Integrations → Webhooks → New Webhook → Copy Webhook URL).
Only https://discord.com/... URLs are accepted. The channel is validated and marked verified on save.
Paste the incoming webhook URL from your Slack workspace (Slack apps → Incoming Webhooks → Add New Webhook to Workspace).
Only https://hooks.slack.com/... URLs are accepted. The channel is validated and marked verified on save.
Enter any https:// URL that should receive the JSON payload. Optionally add a signing secret — when set, every request includes an X-Swetrix-Signature: sha256=<hex> header so you can verify the body wasn't tampered with.
Webhook channels stay Pending verification until you click Verify in the channel list — Swetrix sends a one-off ping that your endpoint must respond to with a 2xx status within 5 seconds. See Webhook payload below for the exact JSON shape.
Web push is a User-scope channel only. From your account's notification channels page, click Enable browser notifications:
- Your browser asks for notification permission.
- Swetrix registers a service worker (
/sw.js). - The current device is registered as a channel and verified immediately.
You can enable web push on multiple devices — each one becomes its own channel.
Push notifications only fire while the browser is running (or, on supported platforms, in the background). They are not a substitute for email or webhook delivery if you need guaranteed receipt.
Name the channel and save
Give it a descriptive name (e.g. "Engineering Slack" or "On-call email") and click Create. Channels that need verification will show a Pending verification badge until they're confirmed.
Send a test message (optional)
Use the Send test button (paper-plane icon) on the channel row to dispatch a sample message right away — it works even before verification, so you can confirm the destination is wired up correctly.
Webhook payload
Custom webhook channels receive a JSON POST with this shape:
{
  "type": "alert",
  "subject": "[Swetrix] High traffic alert triggered",
  "body": "🔔 Alert *High traffic alert* triggered!\n\nProject: ...",
  "context": {
    "alert_name": "High traffic alert",
    "project_name": "My website",
    "project_id": "abcdef",
    "dashboard_url": "https://swetrix.com/projects/abcdef",
    "value": 1234,
    "threshold": 1000,
    "condition": "greater than",
    "time_window": "1 hour",
    "metric": "page_views"
  },
  "timestamp": "2026-04-24T10:00:00.000Z"
}
If you configured a signing secret, every request also carries this header:
X-Swetrix-Signature: sha256=<hmac of the raw body>Always verify the signature on your side. Compute HMAC-SHA256(secret, raw_request_body) and compare it to the value after sha256= using a constant-time comparison — this guarantees the request really came from Swetrix and wasn't replayed or modified in transit.
The verification ping uses the same headers but a smaller payload: { "type": "verification", "timestamp": "..." }.
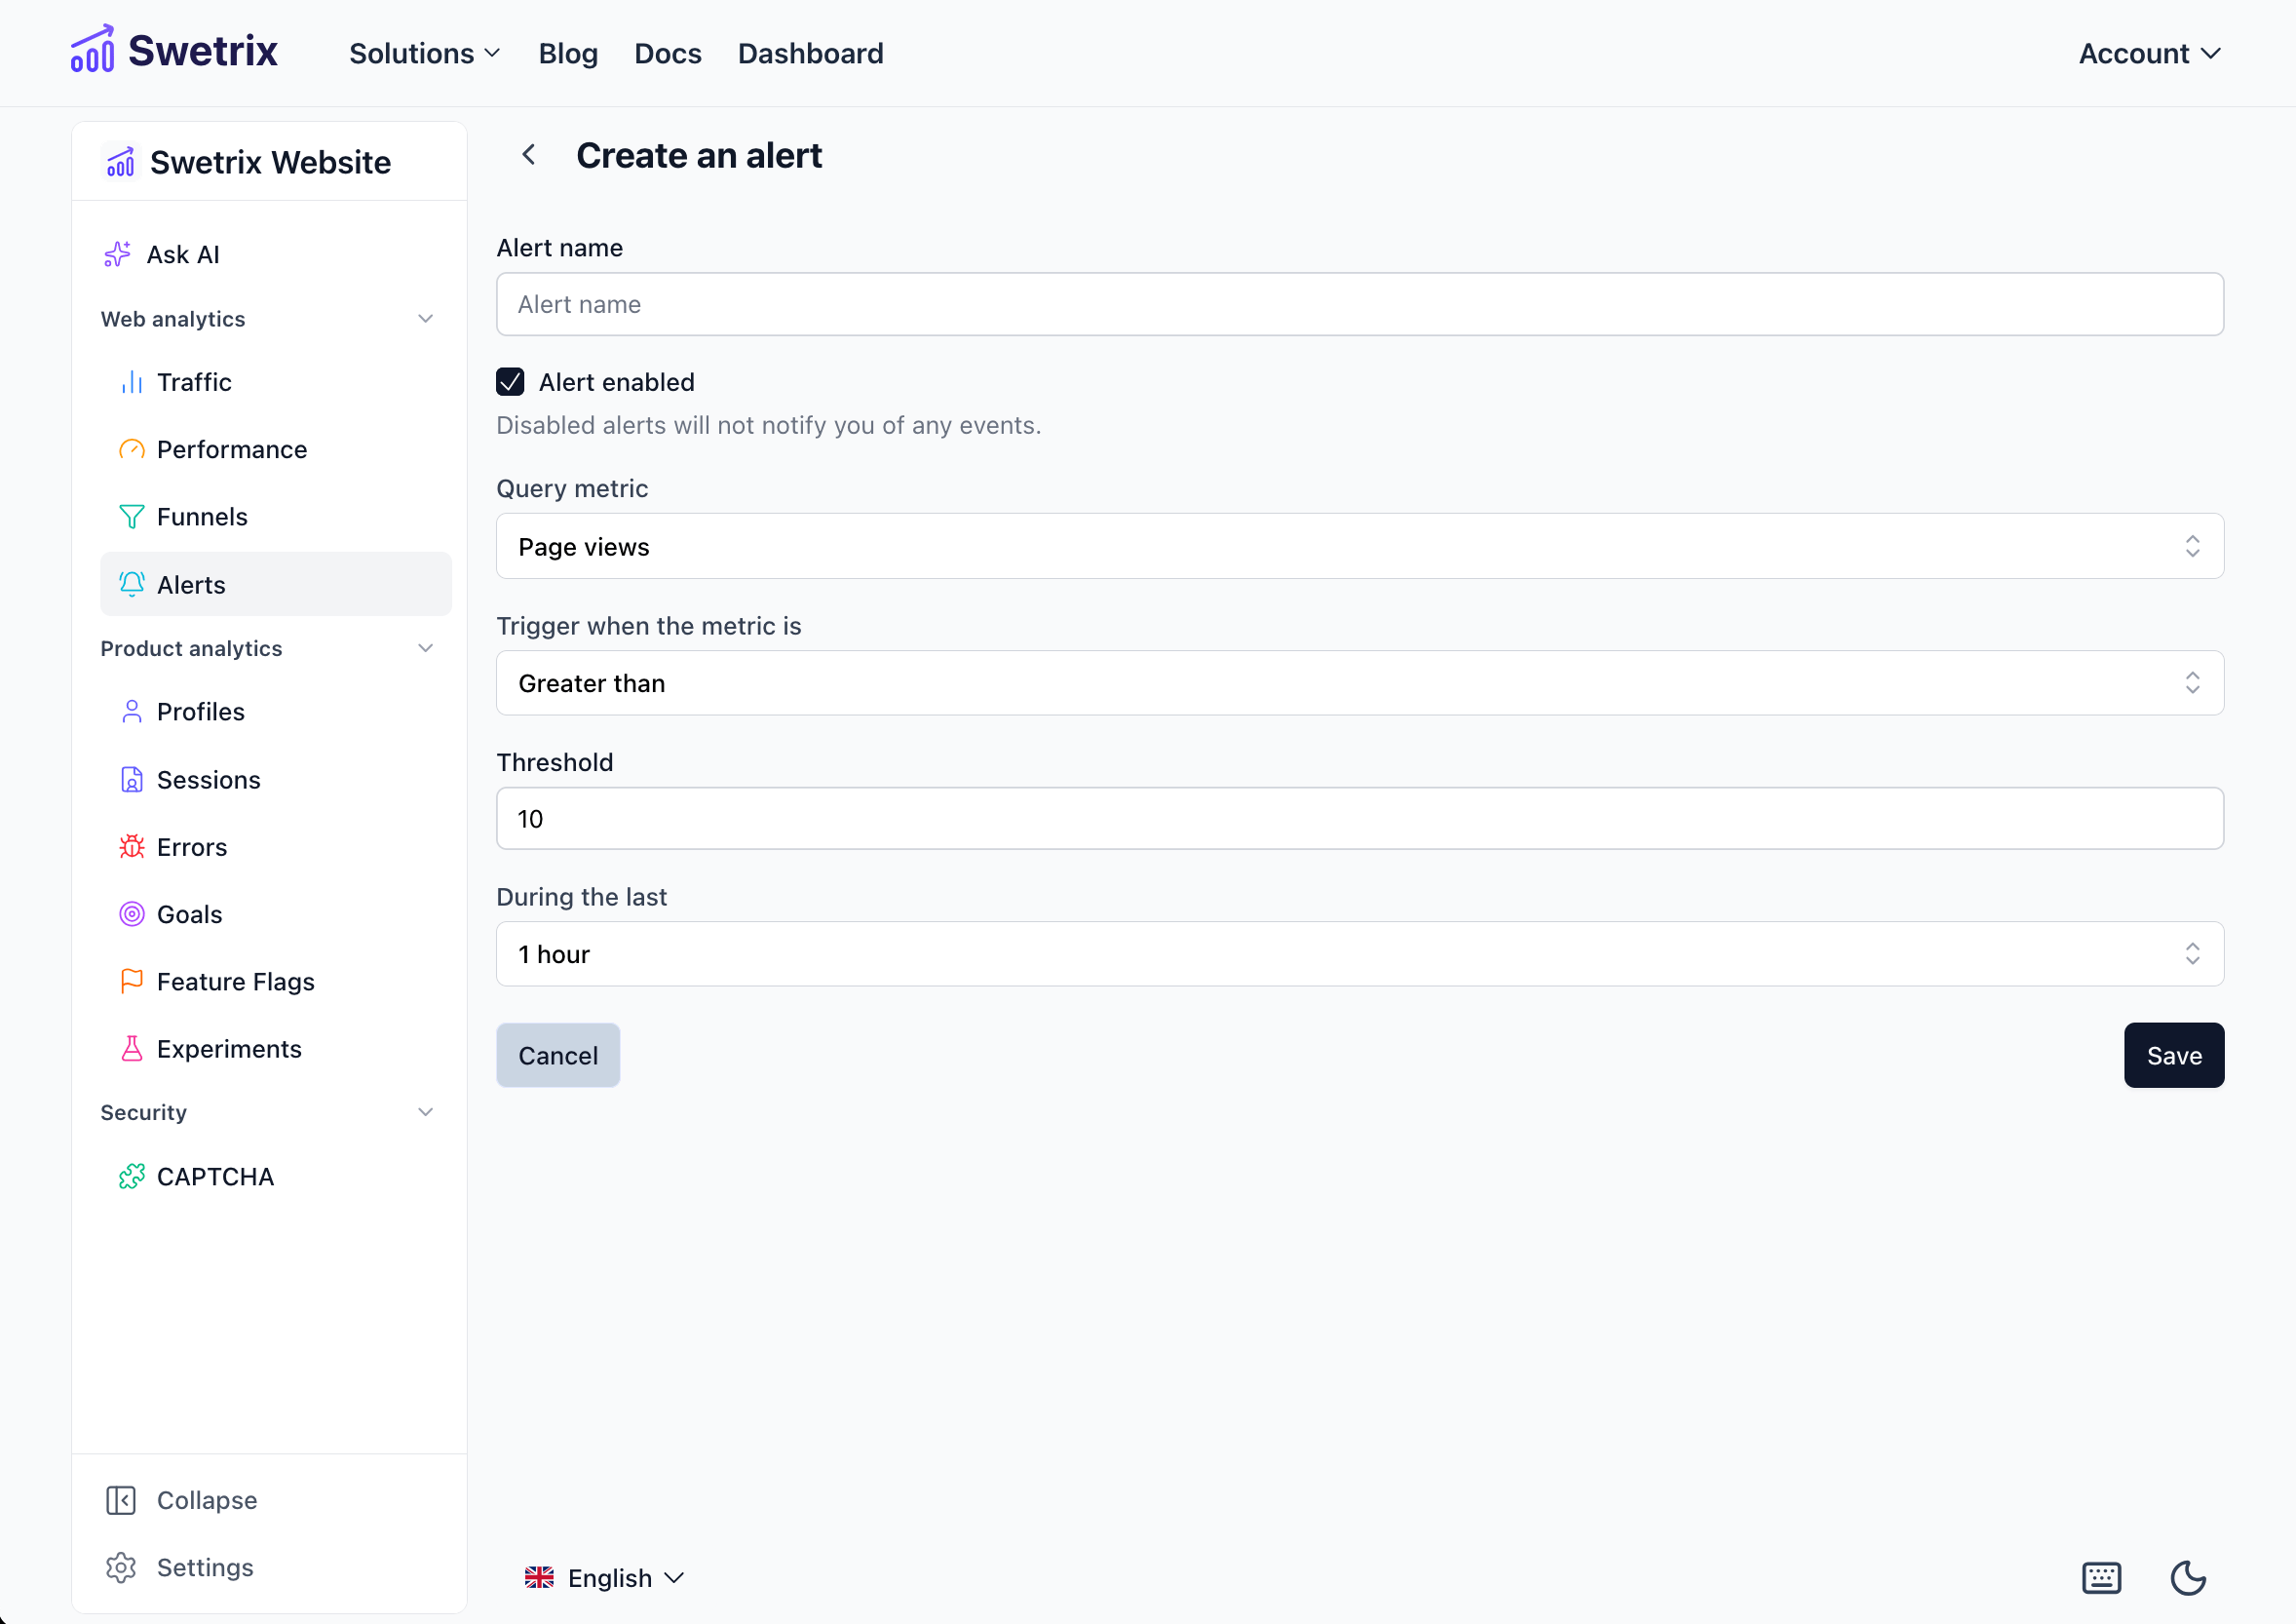
Creating an alert
Open the project's alerts page
In your project, go to Settings → Alerts and click Add alert.
Fill in the basics
Give the alert a short, human-readable name (e.g. "Homepage traffic dip") and decide whether it should be Enabled. Disabled alerts never fire — useful for temporarily silencing an alert without deleting it.
Configure the trigger
Pick what fires the alert:
- Metric — Which data point to monitor (see Supported metrics below).
- Condition —
greater than,greater than or equal to,less than, orless than or equal to. - Threshold — The number the metric is compared against.
- Time window —
15 minutes,30 minutes,1 hour,4 hours,24 hours, or48 hours. Swetrix evaluates the metric over this rolling window.
Two metric-specific options change the form:
- Custom events — Provide the event name (e.g.
signup). Tick Alert on every custom event to fire on every occurrence and skip the threshold/time-window settings. - Errors — Tick Alert on new errors only to be notified just for the first occurrence of each new error (great for catching regressions after a release).
Pick the notification channels
The picker shows every channel in scope for the project — personal, organisational, and project-specific — with their current verification status. Tick as many as you like (e.g. send to your team's Slack and your personal Telegram at the same time).
If no channels are connected yet, the picker links straight to Project Settings → Notification channels so you can add one.
Customise the message (optional)
Decide what Swetrix says when the alert fires. Leave the message blank to use the sensible default for the chosen metric, or write your own using Markdown and Handlebars variables — see the next section.
Message templates
Type { in the editor (or click any chip below it) to insert a variable. The body supports a common subset of Markdown — bold, italics, links, inline code, lists, and line breaks. Use the Preview button to see exactly how the message will render with sample values.
Different destinations format Markdown a little differently — Telegram and Slack treat single *text* as bold, while CommonMark treats it as italic. Swetrix normalises this so the preview matches what your recipients actually see.
Common variables
Available for every alert:
| Variable | Meaning |
|---|---|
{{alert_name}} | The alert's name, as configured in the form. |
{{project_name}} | The project this alert belongs to. |
{{project_id}} | The project's unique identifier. |
{{dashboard_url}} | Direct link to the project dashboard. |
{{value}} | The metric value that triggered the alert. |
{{threshold}} | The threshold the value was compared against. |
{{condition}} | The comparison operator (e.g. "greater than"). |
{{time_window}} | The window the metric was measured over. |
Metric-specific variables
Each metric exposes a few extras of its own:
Default templates
Swetrix ships with two defaults that use these variables:
🔔 Alert *{{alert_name}}* triggered!

Project: [{{project_name}}]({{dashboard_url}})
Value: *{{value}}* {{condition}} *{{threshold}}* in the last {{time_window}}.
For error alerts:
🐞 Error alert *{{alert_name}}* triggered!

Project: [{{project_name}}]({{dashboard_url}})
Error: `{{error_name}}`
Message: `{{error_message}}`

[View error]({{errors_url}})
Email subject
If at least one of the alert's selected channels is an Email channel, an Email subject field appears above the body. Variables work here too. The default is:
[Swetrix] {{alert_name}} triggered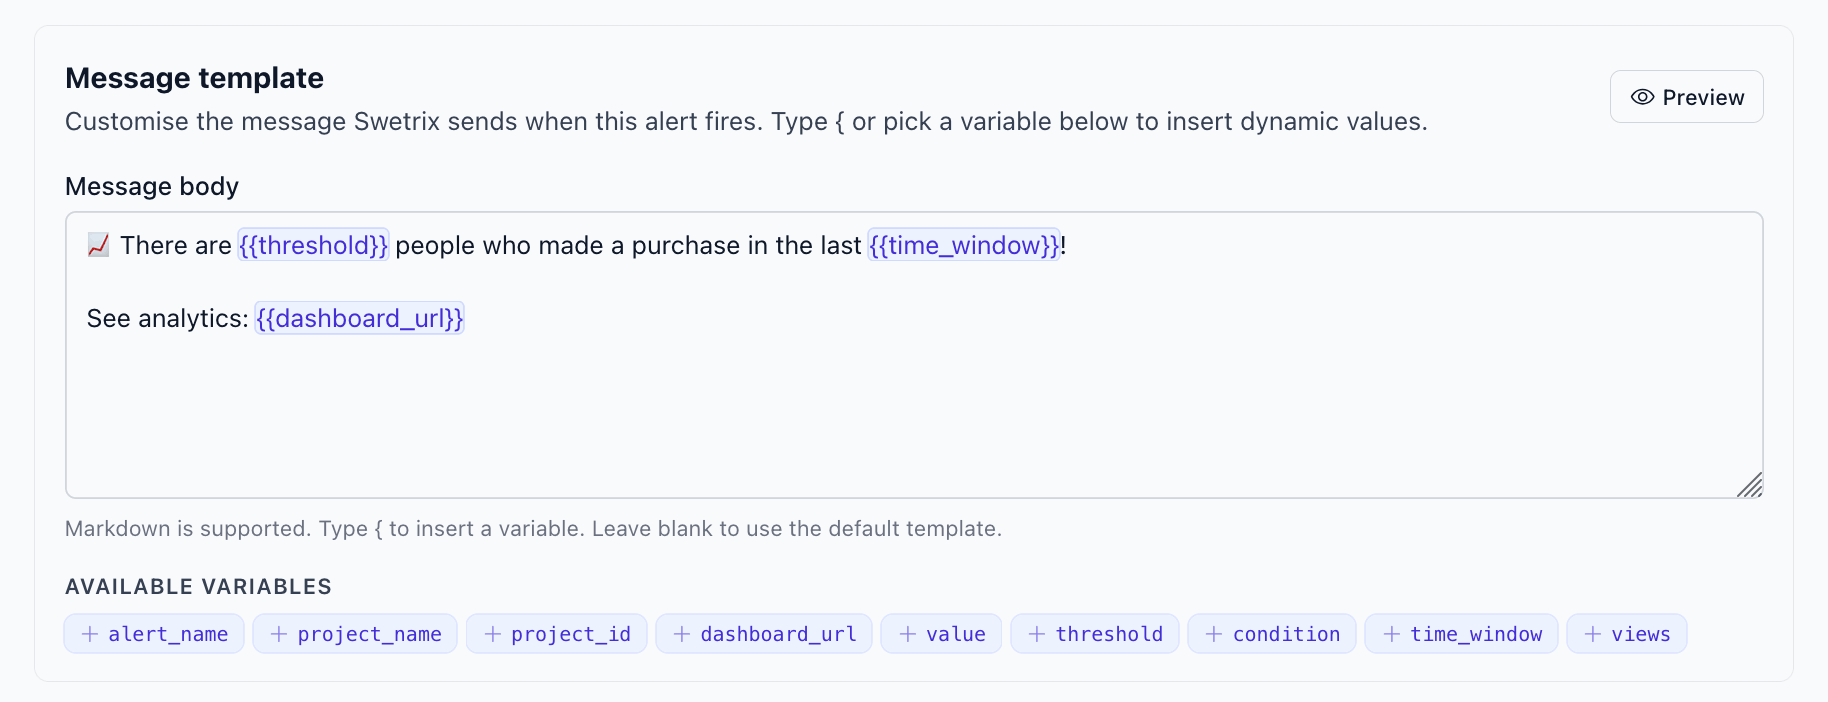
Supported metrics
You can create alerts based on any of these metrics:
- Page views — Total page views in the time window.
- Unique sessions — Number of distinct sessions in the time window.
- Online users — How many visitors are currently active on your site.
- Custom events — Watch a specific event by name, or alert on every custom event.
- Errors — Track JavaScript errors. Choose between every error or only new ones (handy after a deployment).
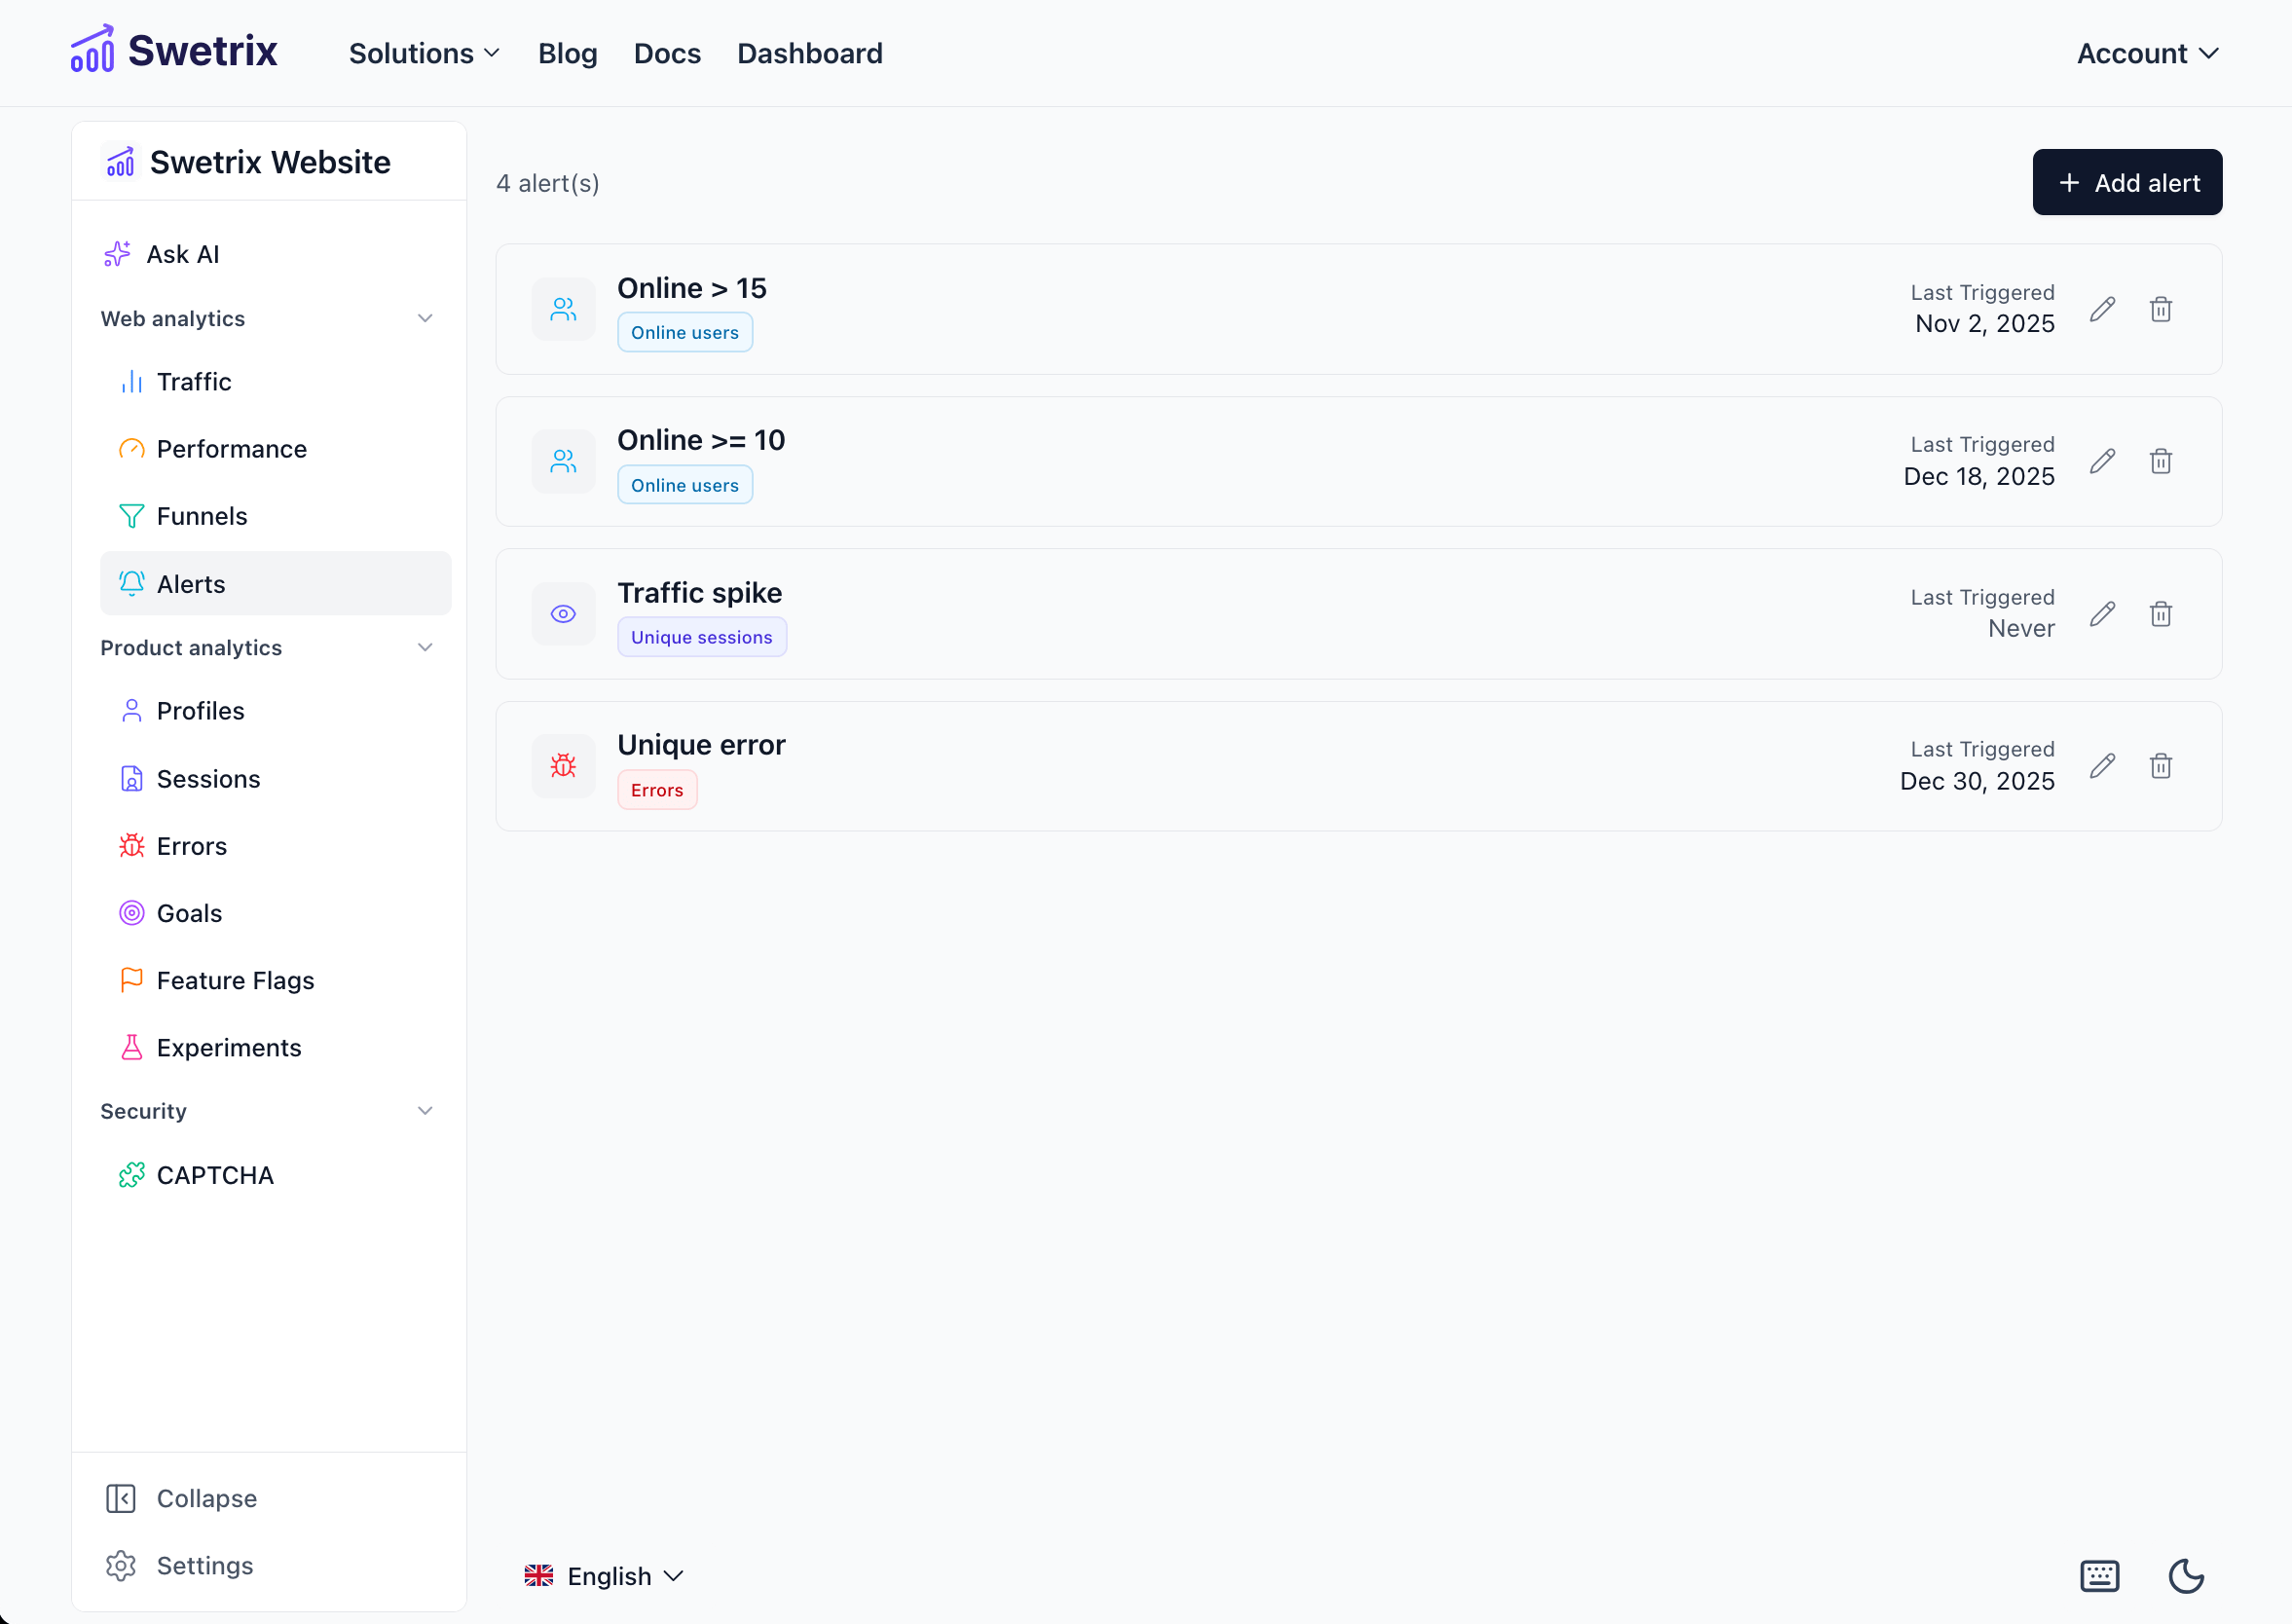
Managing alerts
All of a project's alerts are listed under Project Settings → Alerts. From there you can:
- Edit — Click the pencil icon (or anywhere on the row) to change thresholds, channels, or the message template.
- Delete — Click the trash icon to remove an alert permanently.
- Disable — Toggle the Enabled switch in the alert form to silence it without deleting.
- See the last triggered time — Each row displays when the alert most recently fired, so you can spot noisy alerts quickly.
Example use cases
Related
Error tracking
Pair error alerts with the dedicated error dashboard for stack traces, affected sessions, and resolution workflow.
Email reports
Recurring traffic summaries delivered to your inbox — complementary to real-time alerts.
Teams & Integrations
Set up organisation-scope channels so your whole team gets the same alerts.
Help us improve Swetrix
Was this page helpful to you?