- Date
How To Setup Analytics For WordPress Without Plugins Safely
 Andrii Romasiun
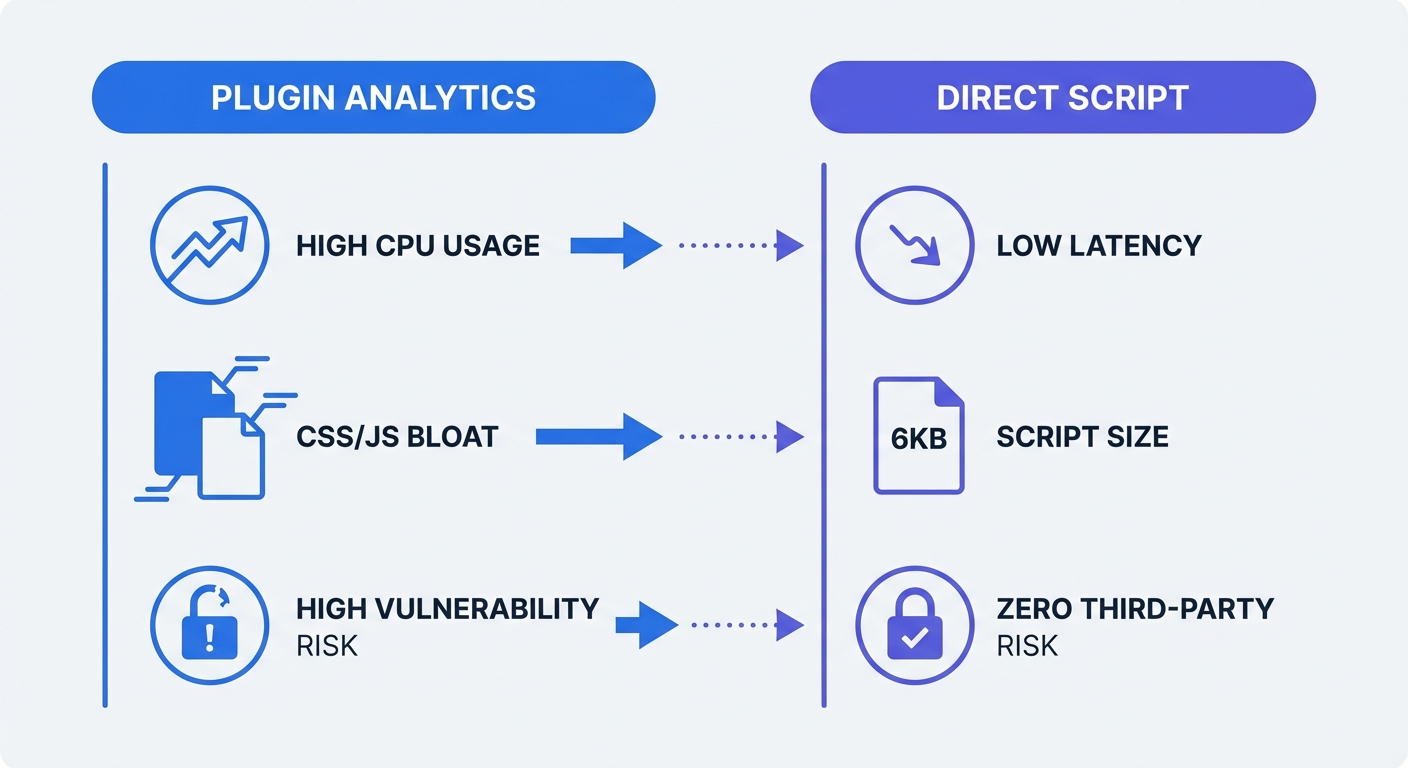
WordPress runs 42.6% to 43.5% of all websites. Administrators default to searching the repository and clicking "Install" for every required feature. Analytics integrations represent the worst offenders for generating unnecessary bloat. Third-party tracking tools drag down core performance metrics and expose the server to severe security risks.
Site owners face an immediate penalty for bloated code. Mobile page load times exceeding 3 seconds increase bounce rates by 32% (Think with Google, 2017), though this varies by industry and content type. Standard analytics add-ons load heavy JavaScript libraries across all pages. These extensions inject proprietary CSS into your header, add multiple HTTP requests, and write excessive transient data to your database tables. Contrast this heavy infrastructure with a native 6KB script (Swetrix, 2026) installed inside your site template. Developers using Swetrix eliminate frontend lag by processing tracking metrics through a lightweight header snippet.
Security researchers identified a massive surge in platform vulnerabilities over the past two years. Analysts documented 7,966 new security flaws within the WordPress ecosystem during 2024, marking a 34% year-over-year increase (Patchstack, State of WordPress Security Report, 2025). Third-party add-ons accounted for 96% of these bugs (Patchstack, 2025). By 2025, global common vulnerabilities and exposures (CVEs) hit 48,185, with plugin exploits acting as a primary driver (Socket.dev CVE Analysis, 2026). Minimizing your plugin count protects your infrastructure from automated attacks.
Attack vectors evolve faster than plugin developers issue patches. Wordfence firewalls blocked 1.6 million attacks targeting specific WordPress plugins in a single 48-hour window (Wordfence, 2025). Threat actors write automated exploit kits using artificial intelligence to scan public IP addresses for outdated directories. Developers abandoned 33% of flawed plugins in 2024 before issuing any security patch (Patchstack, 2025). European legislators responded by passing the Cyber Resilience Act (CRA) (European Commission, 2024). Enforced in 2026, the CRA holds open-source developers liable for vulnerability notifications. Thousands of unmaintained analytics extensions will disappear from the repository.
Uninstall the tracking plugin to drop your security risk. Direct code injection removes the third-party attack surface while preserving accurate data collection.
The Privacy and Compliance Advantage
European courts restrict how you capture and store visitor data. The Schrems II ruling by the European Court of Justice struck down the EU-US Privacy Shield (Court of Justice of the European Union, 2020). Following this legal precedent, the French data protection authority (CNIL) determined that exporting Google Analytics traffic data to US servers violates GDPR Chapter V (CNIL, 2022). The replacement framework faces active legal challenges from privacy organizations like NOYB (NOYB, 2023).
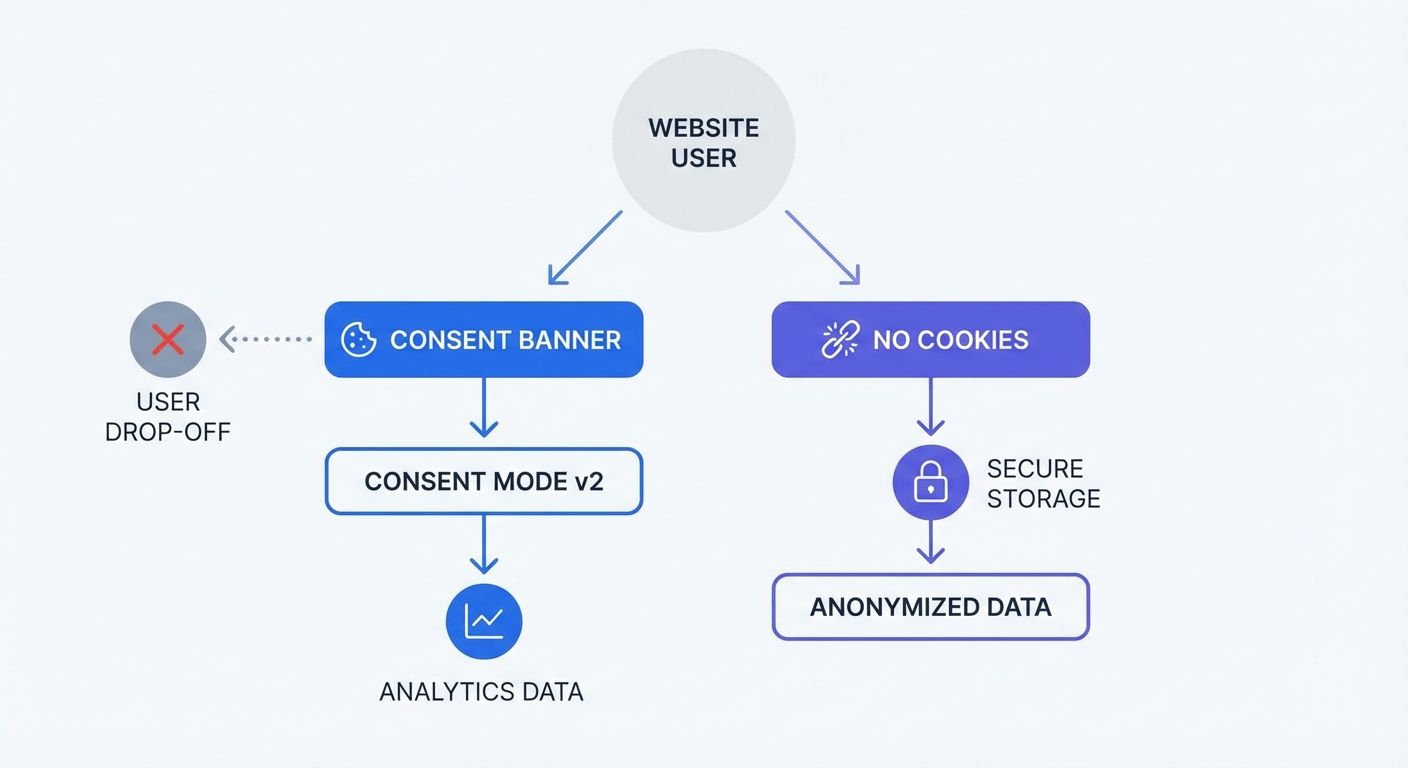
Google modified its tracking protocols in response to European regulators. The company mandated Consent Mode v2 for all European Economic Area traffic starting in March 2024. Browsers must display a banner forcing users to accept or decline cookies. Denied consent triggers a restricted ping mode within the tracking script (Google, 2024). The platform drops session counts, loses conversion attribution, and destroys your website unique visitors metrics.
Cookieless analytics architectures bypass these data restrictions. Privacy-first tools assign an encrypted hash to the visitor session based on anonymized device parameters. The server processes this data on EU machines and deletes the hash each day. Browsers accept the connection because the script writes no first-party cookies to the local storage. Monitor accurate pageview counts and referral sources without violating GDPR mandates.
Removing cookies removes the legal mandate for a consent banner. WordPress administrators combat cookie regulations by installing massive consent management plugins, which inject thick scripts to block tracking tags until the user clicks "Accept". Deleting your cookie-based analytics extension lets you remove the banner extension. The site drops two sources of code bloat. Visitors read the content upon loading without dismissing pop-up overlays.
How to Install Analytics for WordPress Without Plugins
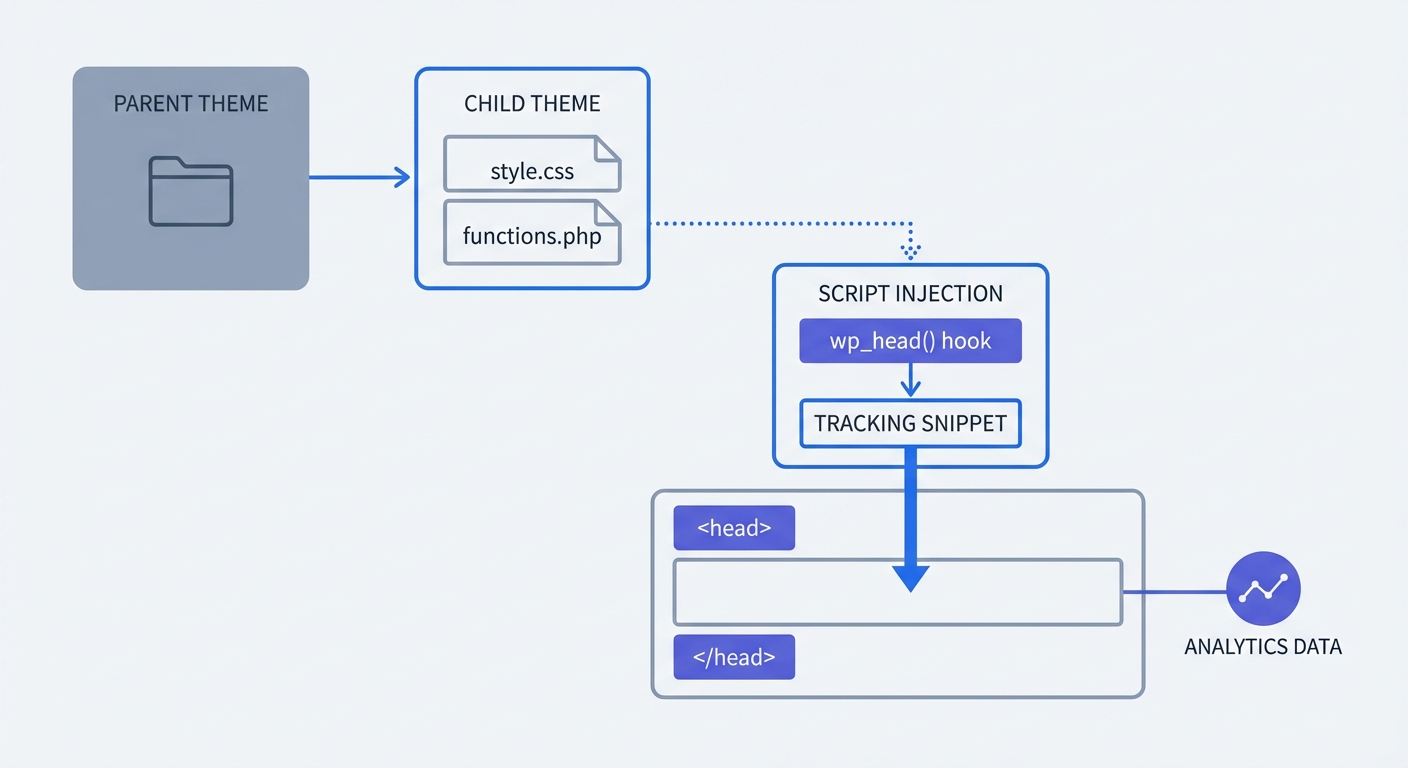
Modifying active theme files to embed scripts creates a maintenance problem. Theme authors release updates to patch security holes or add features. The update process overwrites the directory and deletes your tracking script. Create a child theme to protect your code modifications from these routine updates.
Method 1: The Child Theme Header Approach
Navigate to your server via SFTP or your host's file manager to open the wp-content/themes directory. Create a new folder named after your parent theme with the -child suffix. Build a style.css file inside this blank folder.
Define the stylesheet header to link the child to the parent template. Add this comment block to the top of the file, replacing "twentytwentyfour" with your active theme's folder name.
/*
Theme Name: Custom Analytics Child
Template: twentytwentyfour
*/
Create a functions.php file in the same directory to enqueue the parent stylesheet.
<?php
add_action( 'wp_enqueue_scripts', 'enqueue_parent_styles' );
function enqueue_parent_styles() {
   wp_enqueue_style( 'parent-style', get_template_directory_uri().'/style.css' );
}
?>
Activate the child theme in your WordPress dashboard under the Appearance menu. Copy the header.php file from your parent theme directory. Paste this file into your child theme folder. Open the copied file in a text editor.
Locate the closing </head> tag near the top of the document. Paste your analytics tracking code above this line.
<script src="https://swetrix.org/swetrix.js" defer></script>
<script>
  document.addEventListener('DOMContentLoaded', () => {
    swetrix.init('YOUR_PROJECT_ID')
    swetrix.trackViews()
  })
</script>
</head>
Save the file and load your homepage in a private browser window. Open the developer tools, check the Network tab, and filter by "swetrix" to confirm the script fires with a 200 OK status on page load.
Method 2: Injecting via Functions.php
Administrators use template edits to handle static text structures. Programmatic injection provides a cleaner workflow for managing multiple custom scripts. WordPress uses the wp_head action hook to insert elements into the document head before the server sends the HTML to the browser.
Open your child theme's functions.php file. Write a PHP function containing your script payload. Bind this function to the WordPress action hook.
function inject_custom_analytics() {
    // Prevent tracking logged-in administrators
    if ( is_user_logged_in() && current_user_can( 'manage_options' ) ) {
        return;
    }
    ?>
    <script src="https://swetrix.org/swetrix.js" defer></script>
    <script>
      document.addEventListener('DOMContentLoaded', () => {
        swetrix.init('YOUR_PROJECT_ID')
        swetrix.trackViews()
      })
    </script>
    <?php
}
add_action('wp_head', 'inject_custom_analytics', 5);
The code above includes a conditional check to exclude administrator traffic from your reporting data. The add_action function takes a priority number as the third argument. Setting the priority to 5 forces the server to place the script higher in the <head> section, ensuring it loads prior to heavy stylesheets.
Alternative Server-Side and Theme Integrations
Premium themes provide native insertion fields within the user interface. Frameworks like Astra, GeneratePress, and Kadence feature dedicated hook modules in their dashboard menus. These built-in features negate the need to write custom PHP or manage child directories.
Using Native Theme Hooks
Navigate to the custom elements menu for your specific theme framework and create a new hook element. Paste your tracking code snippet into the provided text area.
Select the wp_head location from the hook position dropdown menu and apply display rules to execute the script across all pages. Exclude sensitive paths, like the checkout confirmation route, using the exclusion toggles. Save the element to publish the code.
Server-Side Tracking with Docker
Client-side tracking faces strict limitations. Browsers block frontend scripts via extensions like uBlock Origin or native settings like Apple's Intelligent Tracking Prevention (ITP). Server-side tracking moves data collection off the visitor's device. The server captures connection data and passes it to the analytics database.
Self-hosting an open-source platform gives you control over the data pipeline. Connect to your Linux server via SSH. Create a new directory for the application and build a docker-compose.yml file.
version: "3.8"
services:
  swetrix-api:
    image: swetrix/api:latest
    restart: unless-stopped
    environment:
      - CLICKHOUSE_HOST=clickhouse
      - REDIS_HOST=redis
    ports:
      - "8080:8080"
    depends_on:
      - clickhouse
      - redis

  clickhouse:
    image: clickhouse/clickhouse-server
    restart: unless-stopped
    volumes:
      - clickhouse_data:/var/lib/clickhouse

  redis:
    image: redis:alpine
    restart: unless-stopped
    volumes:
      - redis_data:/data

volumes:
  clickhouse_data:
  redis_data:
Run docker-compose up -d to pull the images and spin up the containers. The system deploys the API, a Redis cache, and a ClickHouse database. Enterprise architectures use ClickHouse because it processes enormous event logs with low memory consumption. Read ClickHouse vs Snowflake to understand why columnar databases handle analytics workloads better than standard relational tables.
Configure a reverse proxy like Nginx to route external traffic on port 443 to the Docker container on port 8080. Secure the connection using Certbot to generate a free SSL certificate. The WordPress server communicates with the analytics endpoint via backend requests. Ad-blockers cannot interrupt this server-to-server data flow.
Pushing Events via the WordPress REST API
Docker handles complete infrastructure hosting. Send data from WordPress to your analytics endpoint using native PHP functions instead of client-side tracking. The wp_remote_post() function transmits event data from the backend code during specific actions, like a completed WooCommerce purchase.
Open your custom plugin or child theme functions.php. Hook into the woocommerce_thankyou action.
add_action( 'woocommerce_thankyou', 'track_server_side_purchase' );
function track_server_side_purchase( $order_id ) {
    $order = wc_get_order( $order_id );
    $total = $order->get_total();

    $payload = array(
        'project' => 'YOUR_PROJECT_ID',
        'name'    => 'purchase',
        'meta'    => array(
            'revenue' => $total,
            'order_id' => $order_id
        )
    );

    wp_remote_post( 'https://api.swetrix.com/log', array(
        'method'      => 'POST',
        'body'        => json_encode( $payload ),
        'headers'     => array(
            'Content-Type' => 'application/json'
        ),
        'blocking'    => false
    ));
}
Setting the blocking parameter to false instructs WordPress to send the data without waiting for the API to respond. The server continues generating the receipt page. This technique secures revenue data against browser ad-blockers that block frontend purchase events. Review multi-channel attribution models to see how backend tracking attributes server-recorded sales back to the original traffic source.
Tracking Custom Events
Basic pageview scripts ignore specific user interactions. E-commerce sites require data on button clicks, form submissions, and downloads. Traditional setups rely on heavy Tag Manager plugins to detect these actions. Track custom events by binding vanilla JavaScript functions to HTML elements.
Locate the button or form in your template files. Add a specific CSS class or ID to the element. Write a short script in your child theme's footer to listen for the click event and fire the tracking payload.
document.addEventListener("DOMContentLoaded", () => {
  const checkoutBtn = document.getElementById("checkout-button");

  if (checkoutBtn) {
    checkoutBtn.addEventListener("click", () => {
      swetrix.track({
        name: "checkout_initiated",
        meta: {
          source: "header_nav",
        },
      });
    });
  }
});
The track() method sends a custom string to the database. The meta object passes additional context, such as the button's location on the page. Review how to set up event tracking on a website for advanced examples involving form field extraction. Binding events to the DOM uses native browser capabilities and bypasses heavy tag management plugins.
Frequently Asked Questions
Preventing Site Breakage During Injection
Writing flawed code inside PHP files causes fatal errors. Missing a single semicolon in your functions.php document triggers the white screen of death. Using a child theme insulates your parent files from these mistakes. If the site breaks, access the server via FTP, delete the injected code block, and refresh the page to restore functionality. Avoid the built-in WordPress Theme File Editor. Write your scripts on your machine, lint the code for syntax errors, and upload the updated file.
Tracking Core Web Vitals Without Plugins
Performance monitoring works through the browser. You do not need heavy database-querying plugins to track load times. Modern lightweight scripts access native browser performance APIs. A native performance monitoring script captures Time to First Byte (TTFB), DNS resolution duration, and DOM interactive speeds. The script bundles these metrics and transmits them in the background, preventing the data collection process from slowing down the page rendering.
Tracking External Links
Plugins monitor outbound clicks by loading massive jQuery libraries and attaching listeners to every anchor tag. Replicate this functionality using an optimized vanilla script. Add a script block that targets all links containing the target="_blank" attribute or filters out the site's local hostname.
document.querySelectorAll("a").forEach((link) => {
  if (link.hostname !== window.location.hostname) {
    link.addEventListener("click", (e) => {
      swetrix.track({
        name: "outbound_link",
        meta: { url: link.href },
      });
    });
  }
});
This code executes in milliseconds, targets exact parameters, and eliminates the need for bulky third-party behavior tracking add-ons. Read how to track outbound link clicks for exact metric reporting structures.
Blocking Spam Traffic Without reCAPTCHA
Spam bots crawl WordPress forms and flood analytics dashboards with fake referrals. Site administrators install Google reCAPTCHA to stop this, adding another heavy script to the frontend. Implement a server-side reCAPTCHA alternative to reject automated traffic at the API level. Configure your analytics project settings to filter known bot IP blocks and ignore traffic lacking valid user agents. Block the noise in your data before it hits the database.
Managing UTM Parameters Without Plugins
Marketing teams use plugins to append tracking tags to URLs. Generating campaign links requires no server-side software. Standardize your campaign taxonomy in a shared spreadsheet. Combine the destination URL with the source, medium, and campaign variables. A standalone UTM code builder provides a graphical interface to structure these links without touching the WordPress database. Paste the generated URL into your social media ads or email templates. The lightweight header script reads the query parameters upon landing.
Protect your WordPress site from plugin vulnerabilities while securing accurate, GDPR-compliant data. Swetrix offers a 6KB native tracking script (Swetrix, 2026) that bypasses the need for heavy plugins and annoying cookie banners. Start your free trial today and deploy lightweight, privacy-first analytics in under five minutes.