- Date
Caddyfile Reverse Proxy: A Practical Guide
 Andrii Romasiun
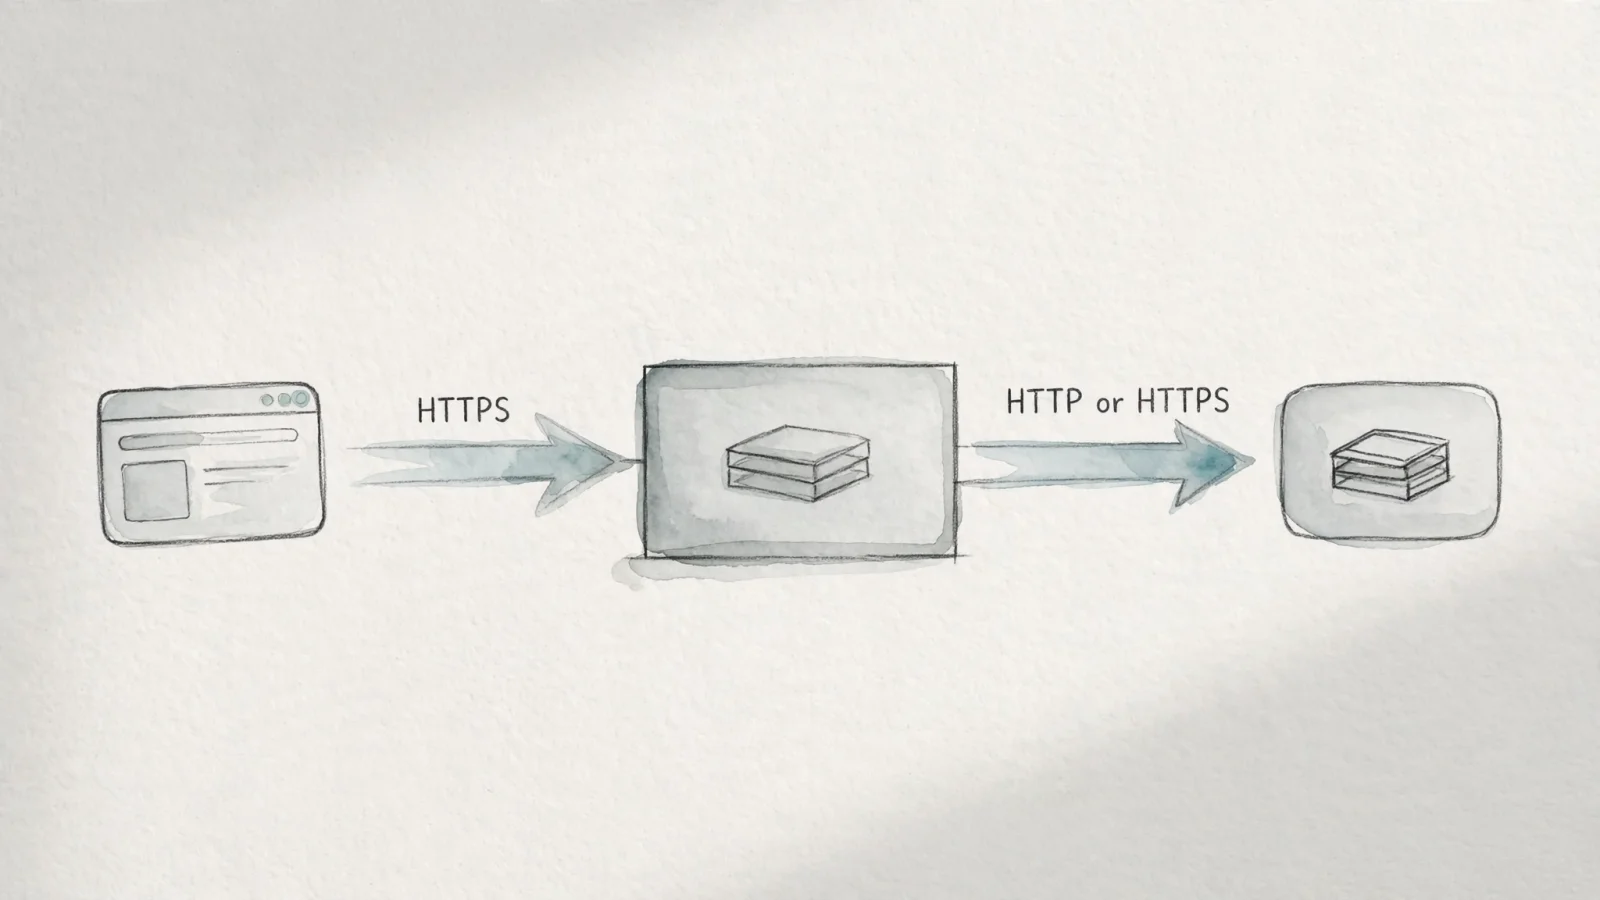
A Caddyfile reverse proxy makes Caddy the public-facing edge server while forwarding requests to an application that remains on a private address. You set up a domain, Caddy secures it with a publicly trusted certificate, and visitors interact with your application over encrypted HTTPS. The browser remains on the public URL, while the backend processes the traffic safely behind the proxy.
This architecture separates routing from application logic. A visitor connects to Caddy over HTTPS, which evaluates the request against your routing rules before opening a new connection to your internal application.
A redirect response tells the client that the requested resource is available at a different URL, so the client can try that URL instead.
Once Caddy solves the availability and routing problem, you need to measure what happens next. Swetrix provides a privacy-first measurement layer to help you understand traffic sources, conversions, errors, and user flow without intrusive cookie banners. Before tracking that behavior, however, you need a working public endpoint.
1. Prepare Your Backend, DNS, and Network Connections
Before writing configuration rules, establish the environment Caddy requires to issue certificates and route traffic.
- Run the backend application. Caddy cannot proxy to an offline port. Start your application and verify it accepts local connections by running
curl http://127.0.0.1:3000from the server terminal. - Install Caddy. Ensure the Caddy binary is available in your shell, and check the release with
caddy version. Since syntax sometimes changes between major releases, knowing your version helps align your configuration with the current official documentation. - Configure DNS. Choose a public domain for your production environment. Create an A record pointing to the public IPv4 address of your Caddy server, and, if you use IPv6, an AAAA record for IPv6.
- Open firewall ports. External access to TCP ports
80and443allows Caddy to solve HTTP and TLS-ALPN challenges.
To use Caddy's HTTPS setup, you need a registered public domain, DNS records that point to the server, and external access to ports 80 and 443. The certificate provisioning guide lists those conditions as prerequisites, then shows Caddy provisioning a TLS certificate when the site address contains a domain name.
2. Write and Test the Minimal Caddyfile
The smallest useful production configuration consists of a site address and a proxy directive. Open your Caddyfile and define the route:
example.com {
    reverse_proxy 127.0.0.1:3000
}
The site address example.com selects the public host and triggers automatic HTTPS, while the reverse_proxy directive acts as the request handler. The address 127.0.0.1:3000 represents the backend destination reachable from the Caddy process.
To test configuration logic locally without triggering rate limits at certificate authorities, use an explicit plain HTTP variant:
http://localhost:8080 {
    reverse_proxy 127.0.0.1:3000
}
Prefixing the site address with http:// makes plaintext local testing intentional. You can test this endpoint with curl http://localhost:8080. Isolating the proxy behavior on local HTTP confirms your routing logic works before introducing external DNS and TLS validation variables, because if this local route fails, the production route will fail as well.

3. Route Docker Apps and Path-Based Services
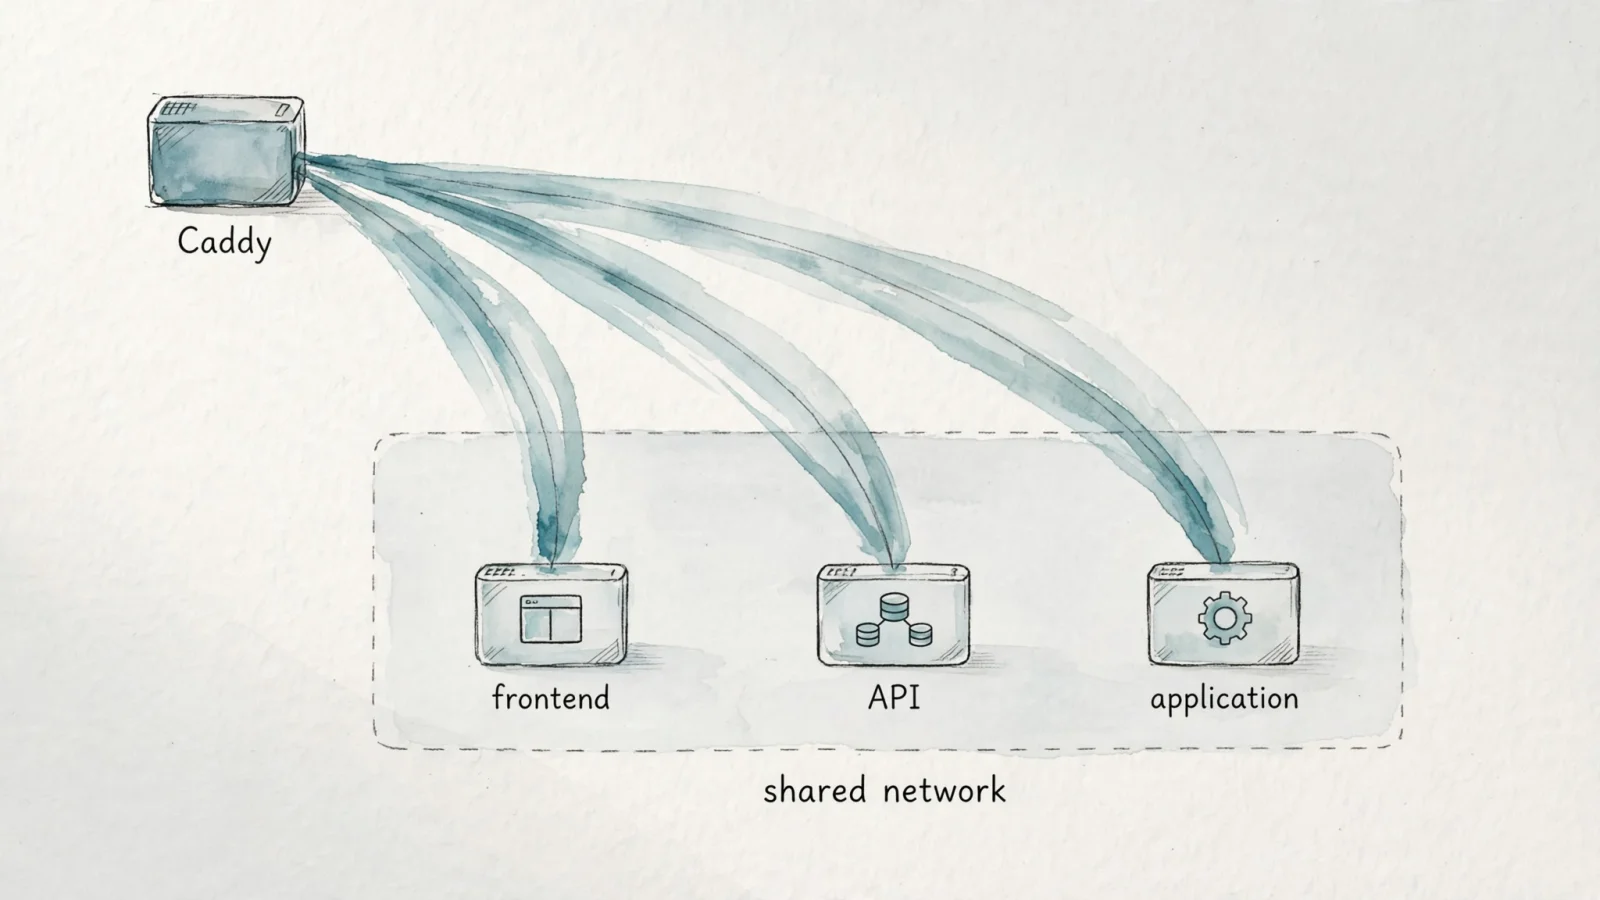
Containerized environments change how Caddy resolves the backend address. If Caddy runs in a Docker container, 127.0.0.1 refers to the Caddy container's own internal loopback interface rather than the host machine or the application container.
To route traffic between containers, place them on the same Docker network and use the application's service name as the upstream address.
services:
  caddy:
    image: caddy:2.8
    ports:
      - "80:80"
      - "443:443"
      - "443:443/udp"
    volumes:
      - ./conf:/etc/caddy
      - caddy_data:/data
      - caddy_config:/config
    networks:
      - webnet

  app:
    image: my-backend-app:latest
    networks:
      - webnet

networks:
  webnet:
With the containers sharing the webnet network, write the Caddyfile to target the app service:
app.example.com {
    reverse_proxy app:3000
}
Mount an Application Under a Subpath
Deploying multiple services under one domain requires path routing. Caddy offers two mutually exclusive path-matching directives: handle and handle_path.
If your application expects to operate at the root level but you want to expose it at /app, use handle_path:
example.com {
    handle_path /app/* {
        reverse_proxy 127.0.0.1:3000
    }

    handle {
        root * /srv/public
        file_server
    }
}
The handle_path directive matches the prefix /app/ and strips it from the URI before forwarding the request, which means a request for example.com/app/users reaches the backend as /users.
This creates the subfolder problem. If the backend generates HTML containing absolute links to /styles.css instead of /app/styles.css, those assets will return a 404 error because the browser requests them from the domain root. Your application needs to support a configurable base URL to function correctly behind a stripped path prefix. Test your application behavior carefully, and run an SEO Migration Redirect Validator if you plan to move an existing root application to a subpath.
If the backend natively understands the prefix and needs it intact, use handle instead:
example.com {
    handle /api/* {
        reverse_proxy 127.0.0.1:4000
    }

    handle {
        reverse_proxy 127.0.0.1:3000
    }
}
The handle directive preserves the incoming URI entirely, so a request to /api/users reaches the API backend exactly as /api/users. An unparameterized handle block catches all other traffic, forwarding frontend requests to port 3000.
4. Add Headers, Secure Upstreams, and Realtime Support
Caddy passes incoming HTTP headers through to the backend automatically, including the original Host header. The proxy also sets or augments the X-Forwarded-For, X-Forwarded-Proto, and X-Forwarded-Host headers to convey the original client connection details.
Avoid pasting large manual header_up blocks into your configuration to set these standard fields. Caddy ignores untrusted incoming forwarded-header values by default to prevent IP spoofing, but if a CDN or another proxy sits in front of your Caddy server, you can define trusted_proxies in the global servers options block with the upstream provider's IP ranges. This configuration instructs Caddy to trust the provided client IP instead of recording the CDN's address as the visitor.
Proxying to HTTPS Backends
When the internal application requires an encrypted connection, define the upstream with the https:// scheme.
example.com {
    reverse_proxy https://backend.internal:8443
}
For an HTTPS backend, its certificate must be trusted by the system running Caddy. In the documented command-line flow, Caddy passes the Host header through unchanged by default, and the --change-host-header option sets it to the upstream address, as the HTTPS upstream host documentation explains.
Avoid using the tls_insecure_skip_verify option in production, because disabling TLS verification defeats the purpose of an encrypted connection by instructing Caddy to accept any self-signed, expired, or spoofed certificate the upstream presents. Install an internal root CA on the Caddy server or provision valid certificates for your internal network instead. You can verify endpoint trust manually using an SSL Certificate Checker before routing traffic.
WebSockets and Health Checks
The standard reverse_proxy directive supports WebSocket upgrades natively, removing the need for the complex connection-upgrade blocks common in legacy web server configurations.
When you reload the Caddy configuration, the process normally closes existing WebSocket connections to drain old state. If your application relies on long-lived realtime sessions, configure the stream_close_delay or stream_timeout options within the proxy block to manage connection lifecycles gracefully.
For services running multiple instances, define active health checks to ensure Caddy routes traffic only to healthy backends:
api.example.com {
    reverse_proxy 10.0.0.11:8080 10.0.0.12:8080 {
        health_uri /healthz
        lb_try_duration 5s
    }
}
The /healthz endpoint needs to be a real route on your backend that returns an HTTP 2xx status code. When one backend fails the health check, the load balancer removes it from the pool. You can use an HTTP Status Bulk Checker to monitor the endpoints directly and confirm they respond correctly.
Caddy makes your highly available cluster reachable, and once traffic flows smoothly, you can rely on Swetrix to measure the results. B2B companies can integrate privacy-focused analytics directly into admin panels, allowing end users to view product engagement without encountering cookie banners. Swetrix complements edge routing by answering who visited the healthy nodes and which conversion funnels they completed.
5. Validate, Reload, and Troubleshoot Safely
A configuration change can interrupt traffic if it introduces an invalid route, so follow a validation workflow before finalizing it.
- Adapt and validate. Run
caddy adapt --config /etc/caddy/Caddyfile --validate. Caddy documents the validate flag as a stronger check than adaptation alone because it loads and provisions the adapted JSON configuration in memory to check it for validity. - Reload the configuration. Apply the new configuration with
caddy reload --config /etc/caddy/Caddyfile, which gives the running Caddy instance a new configuration through the admin API. The admin endpoint must remain enabled for this command. - Verify the reload. Confirm that the running instance has the new configuration, then test traffic.
- Check the logs. If traffic fails after the reload, inspect the recent logs for the cause.
Diagnose Common Failure Modes
When the reverse proxy breaks, isolate the failure layer.
502 Bad Gateway: Caddy returns this code when the backend is unreachable or refuses the connection. Do not debug Caddy first. Instead, run curl -v http://127.0.0.1:3000 from the server. If the curl command fails, the application likely crashed, bound to the wrong interface, or a local firewall blocked the port. If curl succeeds, confirm the upstream hostname in your Caddyfile exactly matches the backend address.
Redirect Loops: This loop occurs when Caddy forwards an HTTPS request to an application, but the application believes the connection is plaintext HTTP. The application issues a redirect to force HTTPS, routing back to Caddy, which forwards the request again. Check that the backend application is configured to trust Caddy's X-Forwarded-Proto header.
Certificate Errors: If browsers show an invalid certificate warning, Caddy may have failed to issue the Let's Encrypt or ZeroSSL certificate. Check your DNS records, and confirm that the port for the selected challenge is open to the public internet. Caddy uses port 80 for HTTP-01 challenges and port 443 for TLS-ALPN challenges.
Incorrect Client IPs: If your application logs show every visitor originating from a single CDN address (like a Cloudflare IP), the trusted_proxies option is missing. Caddy drops the X-Forwarded-For header from the CDN because it views the proxy as untrusted. Add the CDN's published IP ranges to trusted_proxies in the Caddyfile global options block.
6. Keep the Caddyfile or Move to JSON/API
The Caddyfile offers clear, human-readable syntax for manual maintenance, making it a strong choice for single-application deployments, small clusters, and manually managed infrastructure.
Caddy also accepts native JSON configuration through a REST API. When an agency or software platform generates hundreds of distinct site configurations programmatically, managing a massive text file introduces risk. The API allows scripts to push exact JSON payloads, add specific hostnames, or update backend routing rules without touching the disk. You can start with the Caddyfile, moving to the API only when your deployment pipeline demands programmatic control.
Implementation Checklist and Next Steps
Before deploying your reverse proxy, confirm these details:
- Match the upstream address to your networking model, deciding whether you need
localhost, a bare IP address, or a Docker service name. - Confirm whether the backend needs the subpath prefix preserved or stripped, choosing
handleorhandle_pathaccordingly. - Run the validation command before every systemctl reload to ensure the Caddyfile syntax is valid.
Once Caddy routes your users safely over HTTPS, you can shift your focus from infrastructure to user behavior. Transitioning away from heavyweight analytics trackers does not mean sacrificing product insights. Swetrix acts as a capable Google Analytics Alternative, providing complete conversion funnels, session replays, and custom event tracking in a cookieless environment.
Deploy Caddy to connect your users to the application, then implement Swetrix to measure the traffic, referrals, and conversions that drive your growth.
Connect your Caddy-hosted sites to an analytics platform built for the modern web to understand your application traffic without invading user privacy. Learn more about cookieless tracking and advanced product analytics at Swetrix.com.