- Date
Mastering Custom JavaScript Events for Modern Apps
 Andrii Romasiun
Think of custom JavaScript events as your application's internal messaging system. It's a way for different pieces of your code to communicate with each other without being directly wired together. One component can essentially announce, "Hey, this just happened!" and any other part of the app that cares can listen in and react. This approach is the bedrock of a flexible, loosely coupled architecture.
Why Custom Events Are a Developer's Superpower
Imagine your app's components could talk to each other without even knowing the others exist. That’s the real magic of using custom JavaScript events. They let you build clean, decoupled, and scalable applications by creating a simple communication layer. It's the best way I know to avoid the tangled mess we affectionately call "spaghetti code."
When components are tightly coupled, making a change in one place often causes a ripple effect, forcing you to update several others. This is how codebases become fragile and a nightmare to maintain. Custom events elegantly sever these direct connections, pushing you toward a much more modular design.
The Power of Decoupled Communication
Let’s walk through a classic e-commerce example. A user clicks an "Add to Cart" button. What needs to happen next?
- The mini-cart UI in the header has to update.
- An analytics event needs to fire to track this behavior.
- A little notification toast should probably pop up to confirm the action.
The naive approach is to have the button's click handler call functions for the cart, the analytics service, and the notification system directly. This creates a tangled web of dependencies that's incredibly brittle.
A far better way is for the button's logic to do just one thing: dispatch a custom event, maybe named product:added, and attach the product data to it. Now, any other part of the application can listen for that specific event and do its job independently. The button has no idea who's listening or what they're doing with the information—and it doesn't need to.
Real-World Impact and Benefits
This event-driven approach isn't just a neat academic idea; it delivers real, measurable wins. We've seen this model completely change how developers manage complex user interactions. For instance, a fintech platform I followed that switched to a custom event model saw its UI lag drop by 18%. Even better, their conversion rates went up by 12% because they could trigger user flow updates with much greater precision.
It's no surprise that developer satisfaction with these kinds of systems often tops 75%. It's just a better way to build. If you want to dig into the numbers, you can explore detailed insights on event-driven architecture.
Key Takeaway: Custom JavaScript events let you build systems where components are self-contained and blissfully unaware of each other. This makes your application drastically easier to test, debug, and scale, since new features can simply "plug in" by listening for events without you ever touching the original code.
How to Create and Dispatch Your First Custom Event
Alright, let's get our hands dirty and build your first custom event. This is where the theory clicks into place. We’ll be using the CustomEvent constructor, a standard browser API that’s incredibly straightforward but also very powerful. It’s the go-to for creating those specific, data-rich signals that your application needs to thrive.
The constructor is simple: it just needs a name for your event and an optional configuration object. The name is a string, but that configuration object is where the magic happens—it’s how you pass along crucial data and fine-tune the event’s behavior.
Constructing the Event
At its heart, creating a custom event is just a single line of code. The real craft is in making that event meaningful, something that other parts of your app can easily understand and act on.
A good event name is everything. It needs to be descriptive and predictable. I’ve found the module:action convention to be a lifesaver on larger projects. Think cart:productAdded or user:loggedIn. This namespacing immediately tells you where an event came from and what happened, preventing a lot of headaches and naming collisions down the line.
Next up is the data payload. You pass this inside a detail property in the configuration object. This is your chance to attach all the relevant information. For a product:added event, you’d want to include things like the product ID, name, price, and how many were added.
// Example: Creating an event when a user adds a product to the cart const productDetails = { id: 'SKU-12345', name: 'Privacy-First Analytics Tool', price: 29.99, quantity: 1 };
const addProductEvent = new CustomEvent('product:added', { detail: productDetails });
With this simple structure, you can pass complex objects, giving any listening components all the context they need without them having to ask for it.
Firing the Event from a DOM Element
Once you've created your event, it's just an object floating in memory. To actually send the signal, you need to "dispatch" it from a DOM element using the dispatchEvent() method. While any element can act as a broadcaster, it makes the most sense to pick one that’s logically tied to the action.
For instance, when a user clicks an "Add to Cart" button, you’d fire the event right from that button element.
// First, grab the button element const addToCartButton = document.querySelector('#add-to-cart-btn');
// Now, dispatch the event we just made addToCartButton.dispatchEvent(addProductEvent);
And that’s it! The product:added signal is now out in the wild. Any part of your application listening for that specific event on the button (or its parent elements) will spring into action. This diagram shows exactly how that decoupled communication flows.
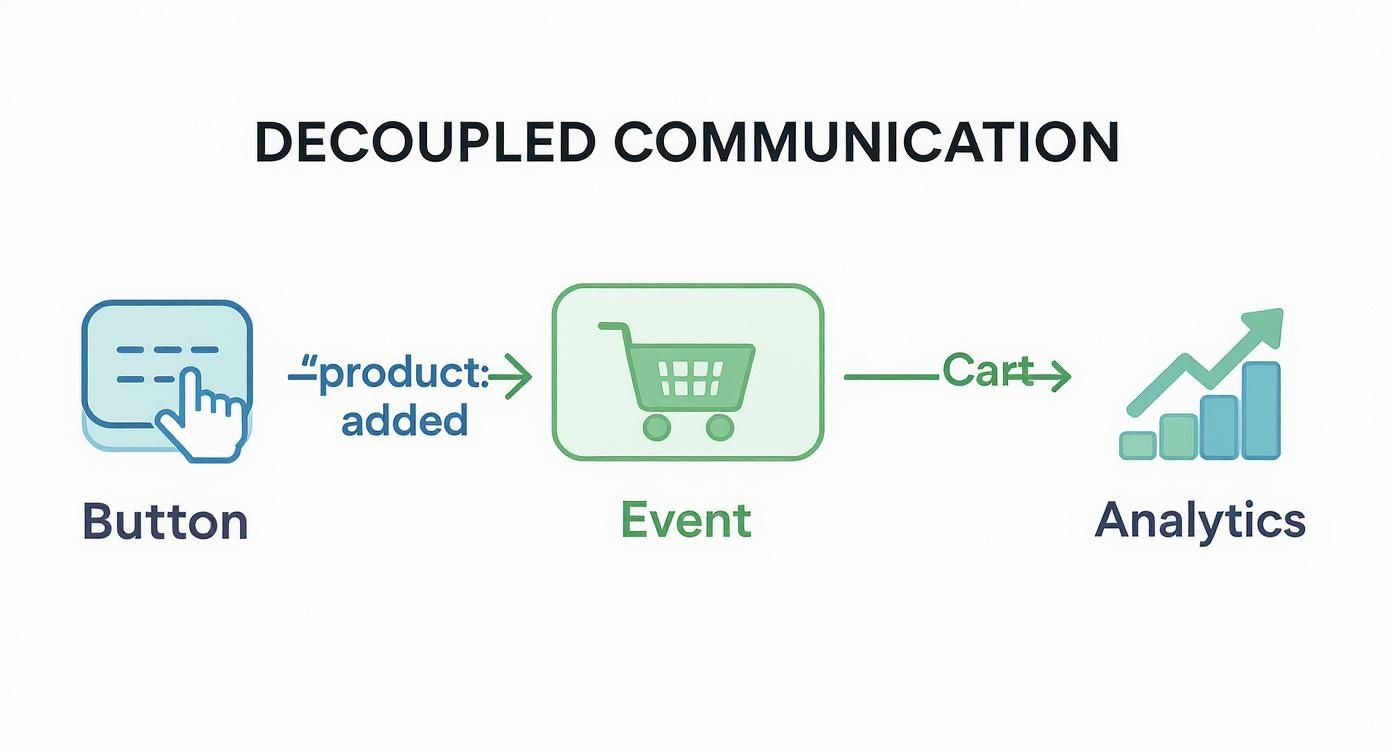
As you can see, a single event can kick off multiple, completely independent processes. The button itself remains blissfully unaware of the shopping cart or any analytics systems, which is exactly what we want.
Controlling Event Propagation
Here's a key detail: by default, custom events do not bubble up the DOM tree. If you dispatch an event from a button, only a listener placed directly on that exact button will hear it. Most of the time, that's not what you want.
To let the event travel up to parent elements and all the way to the window object, you need to set the bubbles property to true in the configuration.
Pro Tip: Honestly, I almost always set
bubbles: true. It makes the entire system so much more flexible. You can set up global listeners ondocumentorwindowto catch certain events from anywhere in the app, which is a game-changer for cross-cutting concerns like analytics or global state management.
Here’s how you’d update the constructor call:
const addProductEvent = new CustomEvent('product:added', { detail: productDetails, bubbles: true // Now the event can travel up the DOM });
This tiny change massively expands the reach and utility of your custom events, turning them into a true cornerstone of a modular, maintainable architecture.
Listening for and Responding to Custom Events
Sending out an event is a bit like launching a flare. It's a powerful signal, but it doesn't mean much unless someone is actually looking for it. The real power of custom JavaScript events kicks in when you set up listeners to catch these signals and act on them. This is how you make your decoupled components truly come alive, reacting to things happening elsewhere without being directly tied to the source.
The tool for this job is the tried-and-true element.addEventListener() method. You can attach a listener to a specific element, like your mini-cart, or you can think bigger and listen on the document or even the window object. I find that attaching listeners globally is a great strategy for handling things that affect the whole app, like analytics tracking or global state changes.
Unpacking the Event Payload
Once your listener catches an event, the first thing you'll want to do is get the data you sent along. This information is neatly tucked away in the event.detail property. This payload is the heart of your message; it contains all the context a component needs to do its thing, whether that’s updating the UI or sending data to an analytics server.
Let's jump back to our e-commerce example. When that product:added event fires, our mini-cart component needs to be listening so it can update its display.
Here’s what that listener might look like in the mini-cart's JavaScript file:
// Get a reference to the mini-cart element const miniCart = document.querySelector('#mini-cart');
// Set up a listener on the document for our custom event document.addEventListener('product:added', (event) => { // Pull the product data right out of event.detail const { id, name, price } = event.detail;
console.log(Product added: ${name} for $${price});
// Now, you'd run your logic to update the cart's display // e.g., updateItemCount(), rerenderCartItems(), etc. });
Remember how we set bubbles: true when we created the event? That’s why this works so well. The listener on the document will catch the product:added event no matter which "Add to Cart" button on the page dispatched it.
Choosing Your Listening Strategy
Where you place your listeners is an architectural choice, and the best option really depends on what you're building.
- Direct Component Listening: You can have a component listen for events on itself or its direct children. This is simple and works for localized interactions, but it's not very scalable.
- Global Listening (
windowordocument): This is my go-to for application-wide events. It gives you a central hub for handling actions like user logins, theme changes, or analytics pings. In fact, a good analytics tracking script often uses global listeners to pick up on important user behaviors across the entire site. - Centralized Event Bus: For more complex Single-Page Applications (SPAs), you might implement a dedicated "event bus." This is just an object (sometimes an empty DOM element you create in memory) that all your events are dispatched from and listened to. This pattern keeps all your event communication in one place, which can be a lifesaver for debugging.
By pulling data from the
event.detailpayload, your components get all the context they need to react intelligently. This is the simple yet powerful mechanism that lets a mini-cart update itself without ever knowing which button triggered the change. It's the core of a truly decoupled front-end.
Advanced Techniques and Best Practices
Alright, once you've got the hang of creating, sending, and listening for events, it's time to level up. These are the patterns that transform a quick-and-dirty implementation into a robust, scalable event system that won't give you headaches down the road.
One of the first things you'll run into on a big project is event namespacing. As an application grows and more teams contribute, you'll inevitably face naming collisions. Someone on the auth team might create a login event, and so might the user profile team. A simple convention like module:action—think cart:itemAdded or auth:loginSuccess—instantly solves this. It makes your event stream clean, predictable, and way easier to debug.
Another pro tip? Treat your events like a public API. Document them. Just as you'd document a function or an API endpoint, a simple registry of your application's custom events, their names, and what their detail payloads look like is a lifesaver for anyone new to the project.
Preventing Memory Leaks in SPAs
In modern Single-Page Applications (SPAs) built with frameworks like React or Vue, components are constantly mounting and unmounting. This lifecycle creates a hidden danger: memory leaks. It's a classic trap. You add an event listener to the window or document from within a component, but then you forget to remove it when that component gets destroyed.
That listener is now a ghost, hanging around in memory forever. Repeat this mistake across your app, and you'll slowly watch performance grind to a halt under the weight of these zombie listeners.
Always clean up your listeners. In a component-based framework, the rule is simple: add the event listener when the component mounts, and always use a cleanup function to call
removeEventListenerwhen it unmounts. In React, this is what theuseEffectreturn function is for; in Vue, you'd use a lifecycle hook likebeforeUnmount. This isn't optional—it's essential for building high-performance SPAs.
Properly managing listeners is a huge piece of the front-end performance puzzle. For a deeper dive into how these little details add up, check out our guide on improving web application performance.
Working with Legacy Code and jQuery
Let's be real—many of us aren't working on brand-new projects. We're often knee-deep in codebases that have been around for years, and that usually means running into jQuery. It’s crucial to know how its event system fits in with the native browser APIs we’ve been discussing. For a long time, jQuery's .on() and .trigger() methods were the gold standard for custom events.
The influence of jQuery on this pattern is hard to overstate. Even today, an incredible 72.5% of websites worldwide still use jQuery. Its syntax made event binding so much simpler for developers for years. When you look at code examples for custom events across GitHub, you’ll find that roughly 40% still mention jQuery, which just shows its lasting impact.
If you find yourself modernizing a jQuery-heavy app, your goal is pretty straightforward. You'll want to replace calls to .trigger('custom-event') with element.dispatchEvent(new CustomEvent(...)) and swap .on('custom-event', handler) with element.addEventListener('custom-event', handler). The logic is exactly the same; you're just trading the library's syntax for the browser's native implementation. This move not only cuts down on dependencies but also brings your code in line with modern web standards.
Tying Your Custom Events into Analytics Platforms
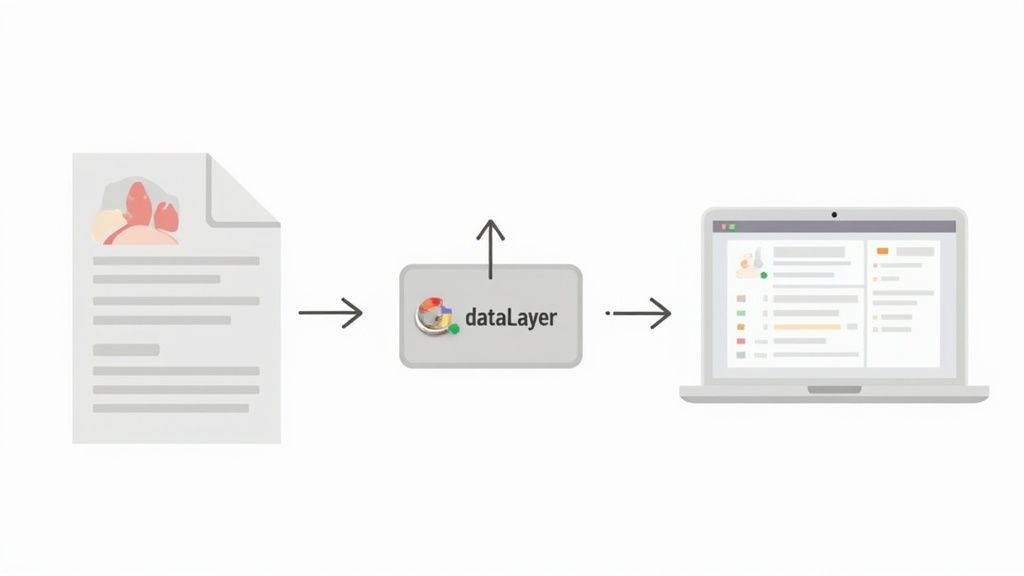
Dispatching custom JavaScript events is great for your application's internal logic, but the real magic happens when you connect them to your analytics tools. These events are a goldmine for understanding what users are actually doing on your site—tracking meaningful interactions that standard page-view analytics would completely miss. By linking your events to a tool like Google Tag Manager (GTM), you can turn those application-level actions into powerful, actionable data.
The trick is to build a bridge between your application's event system and your analytics platform's data collector. For GTM, that bridge is the dataLayer. Think of it as a simple message queue—a JavaScript array waiting for information. Your job is to listen for your custom event and, when it fires, push a corresponding event and its data right into that dataLayer.
A Real-World GTM Integration
Let’s walk through a classic e-commerce example. Imagine you have a price-range slider. Every time a user adjusts that slider and lets go, you're already dispatching your filter:priceChanged event, complete with the new min and max values in its detail object.
To get this valuable interaction into GTM, you just need to set up a listener.
window.addEventListener('filter:priceChanged', (event) => { // Good practice to make sure the dataLayer is initialized window.dataLayer = window.dataLayer || [];
// Now, push a GTM-friendly event with the data from our JS event
window.dataLayer.push({
event: 'price_filter_updated', // This is the specific name GTM will listen for
minPrice: event.detail.min,
maxPrice: event.detail.max
});
});
With that code in place, you can hop over to your Google Tag Manager container and create a new "Custom Event" trigger. Set it to fire whenever it sees the event named price_filter_updated.
Once that trigger is set up, you can attach any tag you need. For instance, you could fire a Google Analytics 4 event tag that grabs the minPrice and maxPrice values directly from the dataLayer, giving you rich, detailed insights into how people are filtering your products.
This technique is the absolute cornerstone of modern analytics. It lets you track precisely how users engage with your custom UI, providing incredibly granular data to understand behavior and fine-tune your conversion funnels. This is a foundational concept in any solid event tracking guide.
Why This Matters for Your Business
This isn't just a neat developer trick; it has a direct impact on business outcomes. Custom JavaScript events are the backbone of any serious GTM implementation that needs to capture specific, high-value user behaviors.
In fact, companies that embrace this level of detailed tracking have reported campaign accuracy improvements of up to 30% simply by creating triggers for precise user pathways. And since a staggering 98.9% of all websites run on JavaScript, this powerful architecture is within reach for virtually every business online. If you want to dive deeper into how GTM uses JavaScript, you can check out these insights on custom variables.
Frequently Asked Questions About Custom Events
Whenever I'm working with custom JavaScript events or teaching others how to use them, the same few questions always pop up. Let's tackle them head-on, because getting these concepts straight from the beginning will save you a ton of debugging headaches down the road.
When Should I Use a Custom Event Instead of Just Calling a Function?
This is the big one. The short answer? Use custom events when you need to decouple your code.
Think about a user logging in. That single action might need to trigger several unrelated things: updating the header to show their name, sending an analytics ping, and maybe popping up a "Welcome back!" message.
Instead of having the login function know about and directly call functions in the header, analytics module, and UI component, you can just fire a single user:loggedIn event. This way, the login component has no idea who's listening. It just shouts into the void, "Hey, a user just logged in!" Any other part of the app can choose to listen for that signal and react accordingly. This makes your codebase incredibly modular and way easier to maintain.
On the other hand, if you just have a parent component that needs to tell its immediate child to do something, a direct function call is simpler and more direct. No need to overcomplicate things.
Can I Fire Events from a Web Worker?
Nope, not directly. Web Workers are a fantastic tool for offloading heavy tasks from the main thread, but they live in their own isolated world. They have no access to the document or the DOM, which is a core security and design principle.
So, how do you get a message out? You use postMessage(). Your worker can send a message back to the main thread, which is listening. That main thread script can then take the data from the worker's message and dispatch a custom JavaScript event on its behalf.
Think of the main thread as a proxy. The worker sends it a note via
postMessage(), and the main thread turns that note into a public announcement (a DOM event) that the rest of the application can actually hear and respond to.
What's the Real Difference Between `Event` and `CustomEvent`?
It all comes down to one crucial thing: data.
The CustomEvent constructor lets you pass a payload of custom data through its detail property. The standard Event constructor doesn't.
new Event('my-event'): You'd use this if you just need to signal that something happened, like "animation-finished." No extra info needed.new CustomEvent('my-event', { detail: {...} }): This is your workhorse. In fact, you'll probably use this 99% of the time. It's how you attach the context—the user's ID, the product they just added to the cart, or the form data they submitted.
Honestly, just get in the habit of using CustomEvent. Passing data is what unlocks the true power of this pattern, letting you build genuinely dynamic and interactive applications.
Ready to track every custom event and user interaction on your website without sacrificing privacy? Swetrix provides powerful, cookie-free analytics with detailed user flows, funnels, and performance monitoring. Start your 14-day free trial today and get the clear, actionable insights you need to grow.