- Date
Privacy-First Analytics for Next.js Applications: A Developer Guide
 Andrii Romasiun
Implement analytics for Next.js applications, and tracked pageviews drop by half. A compliant consent banner worsens the loss. Standard tracking tags clash with single-page application architectures and strict privacy laws. Add cookie-free analytics for Next.js applications to recover lost data, bypass adblockers, and boost site performance.
The Problem with Traditional Analytics in Next.js
The Data Loss Dilemma
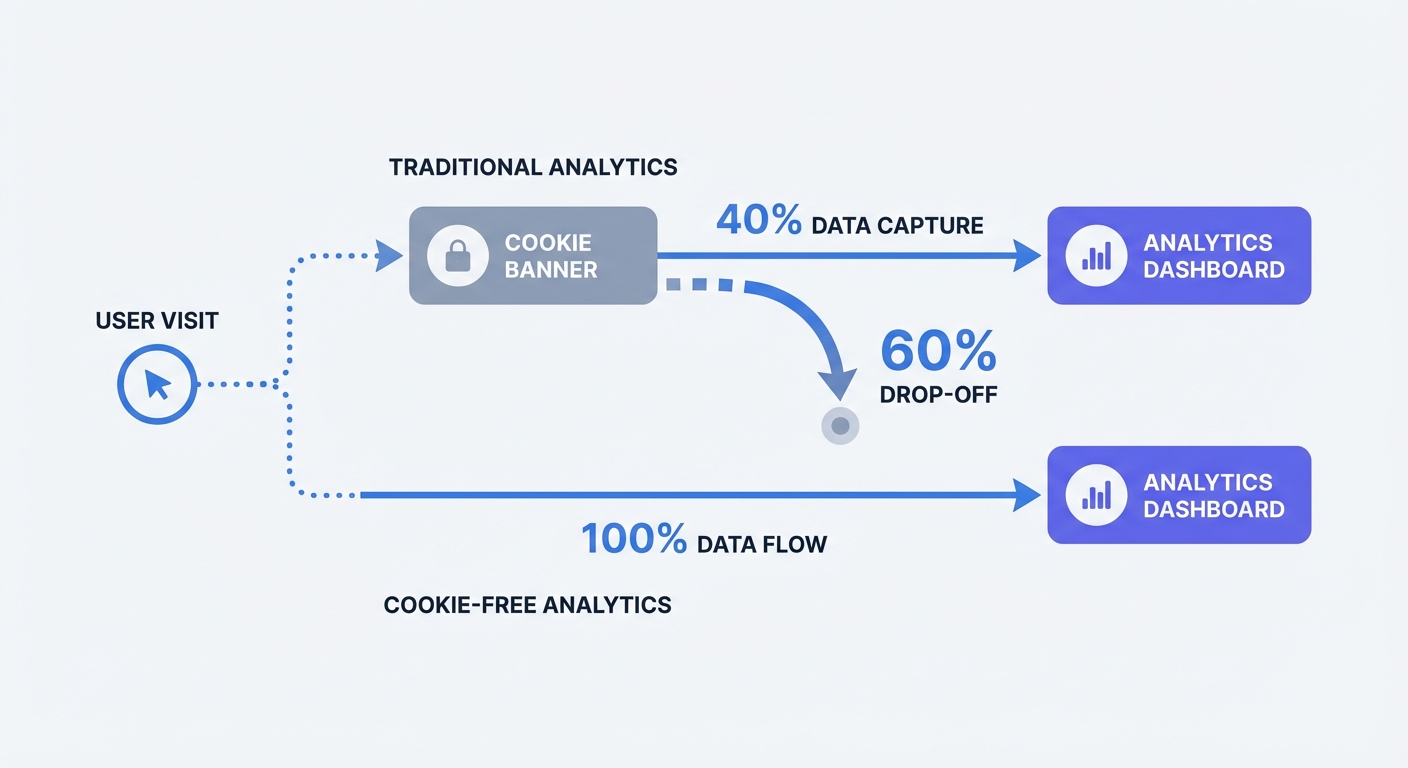
Installing a consent banner forces a choice on site visitors. Facing an explicit opt-in requirement, users hit the reject button or ignore the popup. The 2025 etracker Cookie Consent Benchmark Study reports an average 60 percent data loss across industries because of these banners. Acceptance rates vary by region and content type, with entertainment sites seeing higher opt-ins than B2B portals. Under strict EU laws, 3 to 7 percent of visitors click accept. US audiences opt in at a 10 to 20 percent rate. Combine these rejection numbers, and traditional platforms remain blind to the majority of traffic. Evaluate the current data gap by comparing server request logs to dashboard pageviews. The difference represents the invisible audience.
SPA Routing and Data Blind Spots
Next.js uses single-page application architecture. After the initial page load, the framework handles subsequent navigation via client-side routing. Traditional tracking scripts listen for full page reloads to trigger a pageview event. When a user clicks a next/link component, the browser updates the URL without requesting a new HTML document from the server. Legacy platforms like Google Analytics fail to detect this transition. A visitor reads five different blog posts, but the dashboard registers a single pageview and a bounce. Fix this by implementing React-specific tools. Modern platforms integrate with Next.js router events to fire tracking payloads on client-side transitions.
Why Cookie-Free Analytics Are the Future
Escaping the Cookie Banner
Persistent cookies store unique identifiers on the user device to track behavior across multiple sessions. Privacy laws categorize this practice as invasive. Remove the cookies to solve the problem. Cookieless tracking swaps persistent storage for temporary anonymized hashing. The server generates a daily hash using the visitor IP address and user agent. At midnight, the system purges the salt generating the hash. Yesterday's visitor becomes an unknown entity. Server-side hashing prevents tracking individuals across different websites or building behavioral profiles. This technical limitation allows site owners to bypass explicit consent requirements. Deploy Swetrix on the site to achieve 100 percent data visibility without a consent popup.
Avoiding Privacy Fines
Regulators penalize companies that ignore consent mandates. The CMS GDPR Enforcement Tracker calculates total EU GDPR fines above 5.65 billion Euros. Enforcement extends beyond massive tech conglomerates. Mid-sized stores and agency portfolios face audits when user complaints trigger investigations. Audit the current tracking setup to check compliance. Open browser developer tools, navigate to the Application tab, and inspect the cookies section. Finding _ga or similar tracking tokens loading before the user clicks accept proves the site violates regulations. Switch to a privacy-first model to eliminate this regulatory risk.
| Feature | Legacy Analytics | Cookie-Free Analytics |
|---|---|---|
| Tracking Mechanism | Persistent Cookies | Temporary Anonymized Hashing |
| Consent Banner Required | Yes | No |
| Data Capture Rate | 10 to 40 Percent | 100 Percent |
| SPA Routing Support | Requires Custom Code | Native Integration |
| Adblocker Impact | High Data Loss | Low Data Loss (with proxying) |
Native Integration Methods for Next.js
Setting Up Analytics in the App Router
Moving from the Pages Router to the App Router changed how Next.js handles global scripts and context providers. Server components lack the ability to execute client-side React hooks. Use native wrappers to bridge this gap. The @swetrix/nextjs NPM package provides a configuration tailored for the App Router.
- Open the terminal and run
npm install @swetrix/nextjs. - Create a new client component named
Analytics.tsxin the components directory. - Import the
useSwetrixhook from the package. - Add the
'use client'directive at the top of the file. - Initialize the hook with the project ID.
"use client";
import { useSwetrix } from "@swetrix/nextjs";

export default function Analytics() {
  useSwetrix("YOUR_PROJECT_ID");
  return null;
}
Render this component inside the root layout.tsx file. The layout wraps every route in the application. Placing the component here guarantees the tracking script loads once and fires pageviews on every route change without causing memory leaks.
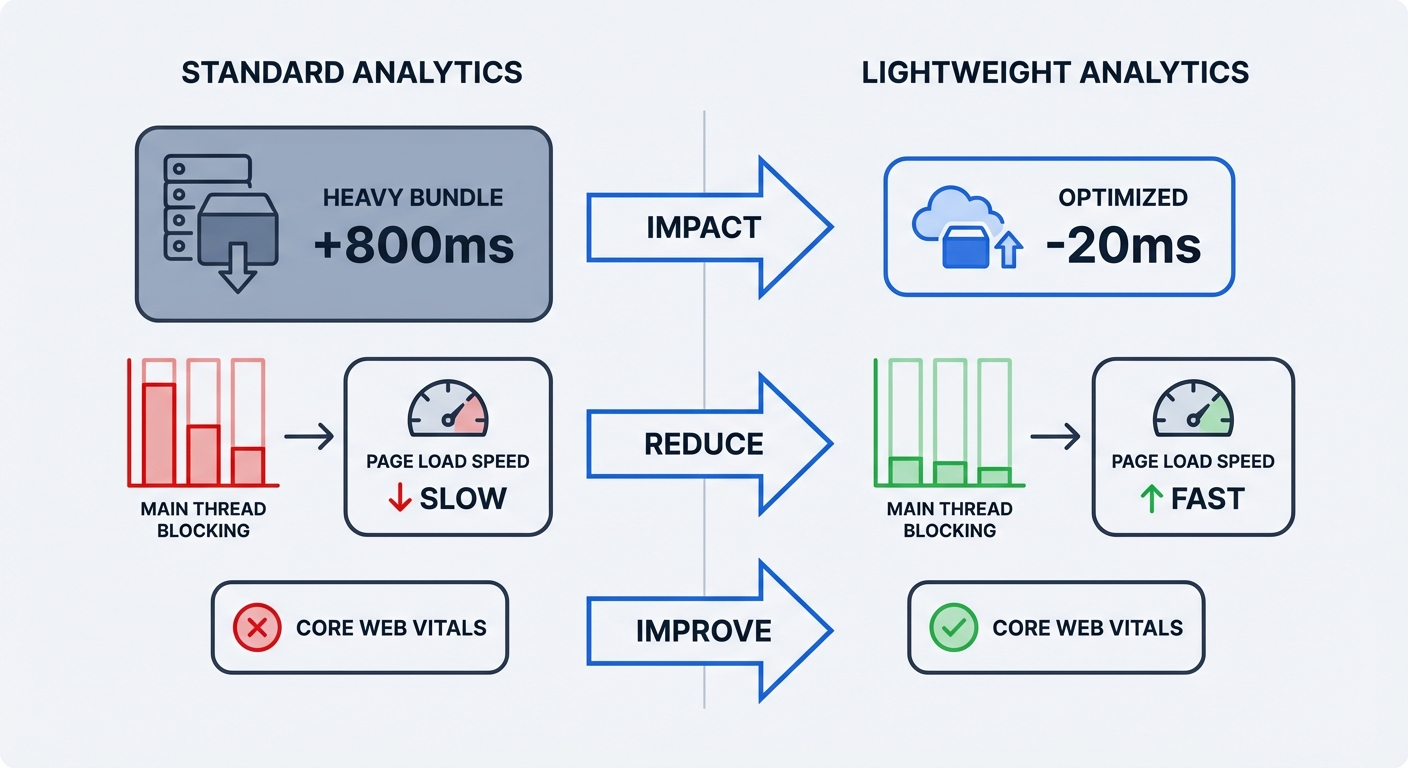
Optimizing with the Script Component
Some teams prefer HTML script insertion over NPM packages. Next.js 15+ demands strict performance optimization to maintain Core Web Vitals. Injecting raw script tags into the document <head> blocks the main thread and delays the Largest Contentful Paint metric. Implement the Next.js <Script> component to manage loading priorities. Open the root layout and import Script from next/script. Assign the strategy attribute to control execution timing.
afterInteractive: Loads the script after the page becomes interactive. Add this setting for baseline analytics.lazyOnload: Waits for idle browser time. Choose this configuration if tracking speed matters less than raw page performance.
Heavy scripts consume processing power on mobile devices. Lightweight alternatives minimize CPU strain. Measure the speed difference before and after swapping platforms. Opening Google Lighthouse in developer tools provides a baseline. Run a performance audit on the production URL. Examine the Total Blocking Time score. Deleting legacy tracking tags from the code allows a cleaner second audit. Monitor technical metrics using a performance monitoring dashboard to catch slowdowns before they impact search rankings.
Tracking Custom Events and Conversions
Beyond pageviews, developers need to measure specific user actions. A visitor clicking a "Request Demo" button indicates high intent. Track these interactions using custom events. The @swetrix/nextjs package exports a track function for this purpose. Import the function into client components. Attach it to standard React event handlers like onClick or onSubmit.
"use client";
import { track } from "@swetrix/nextjs";

export default function SignupButton() {
  const handleSignup = () => {
    track({
      ev: "demo_request",
      meta: { button_location: "hero_section" },
    });
  };

  return <button onClick={handleSignup}>Request Demo</button>;
}
Developers pass a metadata object with every custom event payload. Include contextual details like the button location or the selected subscription tier. Grouping events by metadata organizes feature popularity in the dashboard. Calculate the monetary value of these interactions using a marketing ROI calculator to measure campaign effectiveness.
Bypassing Adblockers with Next.js Rewrites
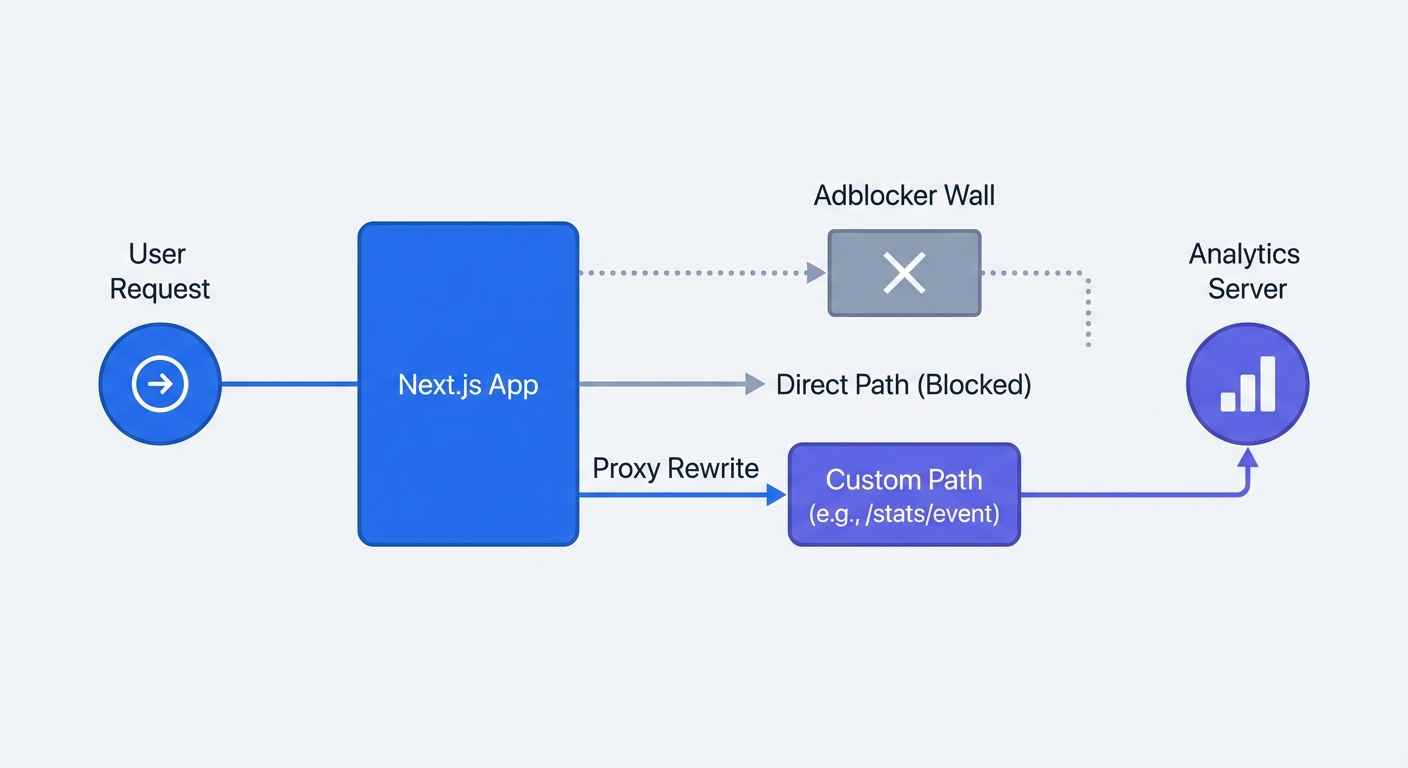
The Rise of Analytics Proxying
Browser extensions and network firewalls intercept outbound tracking requests. These tools use public blocklists like EasyList to identify data collection endpoints. When a user requests a URL containing /analytics.js or api.tracker.com, the extension terminates the connection. Proxying traffic through a first-party domain masks the destination. The browser sends the tracking payload to the local domain. The server forwards the request to the analytics provider. Implement this method to recover up to 30 percent of blocked tracking requests, though the exact recovery volume fluctuates since adblocker adoption ranges from 15 to 45 percent depending on audience demographics.
How to Configure next.config.js
Next.js includes a native rewrites function to handle proxy routing without requiring a separate reverse proxy server like Caddy. Open the next.config.js file. Add an async rewrites array to map a custom local path to the external API.
/** @type {import('next').NextConfig} */
const nextConfig = {
  async rewrites() {
    return [
      {
        source: "/sproxy/:path*",
        destination: "https://api.swetrix.com/log/:path*",
      },
    ];
  },
};
module.exports = nextConfig;
Avoid using words like log, track, or analytics in the source path. Adblockers scan custom paths for these keywords. Choose an unassuming path like /sproxy or /metrics to ensure maximum data flow. Update the initialization code to point to this new custom endpoint instead of the default API URL.
Setting Up Development and Production Environments
Keeping Localhost Data Clean
Development work generates massive amounts of fake traffic. Refreshing localhost fifty times to test a CSS change inflates pageview metrics. Separating development traffic from production data keeps the dashboard accurate and prevents unnecessary API quota usage. Next.js provides built-in environment variables to distinguish between local and live deployments. Wrap the initialization logic in an environment check. Validate that process.env.NODE_ENV equals 'production' before firing the tracking script.
"use client";
import { useSwetrix } from "@swetrix/nextjs";

export default function Analytics() {
  const isProd = process.env.NODE_ENV === "production";

  useSwetrix("YOUR_PROJECT_ID", {
    disabled: !isProd,
    apiURL: isProd ? "/sproxy" : undefined,
  });

  return null;
}
Test routing logic before deployment. Start the local server in production mode using next build followed by next start. Open the network tab in browser developer tools and verify the payload routes through the proxy path without throwing cross-origin errors.
Stop losing data to cookie banners and adblockers. Take control of Next.js application metrics with a platform built for modern privacy standards. Start a free trial at Swetrix to capture accurate, compliant analytics.